
Kinda in the same vein, by the time I started eating mostly raw foods, I had been vegan for many years, so my cheese cravings were pretty much 'gone, baby gone'. Nevertheless, I had a brief stint with fermented seed and nut cheeses early on, thanks to a friend of Don's who had a raw catering service in Victoria. Even though I wasn't really looking for a raw replacement of this old favorite, I still tried my hand at cultured cheese and made a couple of batches, using mostly sunflower seeds and almonds. Neither Don or I were really impressed at the time, so I quickly forgot about it.
 Now we fast forward a few years...
Recently, my interest was rekindled when someone posted Chad Sarno's Cashew Cheese Au Poivre on Raw Freedom Community. I was still a little hesitant, remembering my failed experiments, but curiosity got the better of me (especially after reading how yummy it was!) I decided to take the plunge and give raw nut cheese another chance. Don't know what I was doing wrong before, or perhaps it was just a matter of what type of nuts/seeds I used, but this Cashew Cheese was a whole different story. Boy oh boy, was it ever delicious! And the texture was so like the 'real' thing!
Feeling more confident, I've ventured to play around with a few different variations last week. What a fun and rewarding project! Now I'm all thrilled at the possibilities lying in wait.
So if you're like me and have been keeping away from cultured nut cheese, give one of the following recipes a try. You'll be pleasantly surprised!
Basic Cashew Cheeze
3 cups cashews, soaked 12-14 hours
3 capsules probiotics
2/3 cup fresh rejuvelac (see instructions below)
In high speed blender, blend the soaked cashews with probiotics and rejuvelac until smooth.
Line a sieve with a double thickness of cheesecloth and place over a bowl. Transfer the mixture to the sieve, drape the cheesecloth over the top, cover with a towel and leave in a warm place to ripen for 14-16 hours.
Season according to one of the following recipes (or come up with your own variation!)
Alternatively, shape the mixture into a round, place in a covered container, and refrigerate for at least 24 hours, or until it firms up.
Store in fridge in airtight container for up to 3 or 4 days.
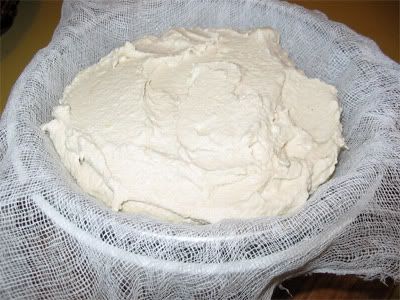
Here's the cheeze mixture freshly out of the Vitamix...
... cozily wrapped up in cheesecloth.
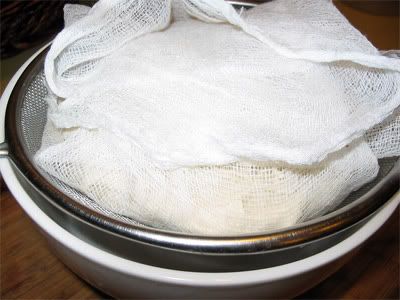
Then after some 16 hours of culturing.

Carmella's Notes:
~ You could sub the probiotics with some miso; the idea is to give the culture a kick start.
~ If you don't have rejuvelac, fresh water would also work.
~ It is key to use as little liquid as possible for best results in terms of texture.
~ You may want to adjust the culturing time, depending on how 'strong' you like your cheeze.
Rejuvelac Demystified
My good friend and accomplished raw chef Heathy was telling me the other day how she felt intimidated by that whole rejuvelac thing. I know where she's coming from as I was in her shoes only a few weeks ago. However, there's really not much to it. Put simply, rejuvelac is obtained by soaking sprouted grains in fresh water for a couple of days, so don't let the length of these next instructions turn you off.
To Make Rejuvelac
I'm sure there are many different ways to make rejuvelac, but here's the basic technique as described on the Sproutpeople's site.
Ingredients
2 Cups Rye
10 Cups Water
2 Qt. Jar
Preparation
1. Soak 2 cups of Rye in your 2 quart jar. Cover with 1 quart or more of cool (60-70 °) water. Stir seeds up to assure even water contact. Soak for 8 - 12 hours.
2. Pour off water.
3. Rinse (fill Jar 3/4 full with water), twirl vigorously, pour water out, and repeat - if necessary - until water runs clear). Use cool (60-70°) water.
4. Drain thoroughly by shaking your Jar - you want as little water as possible to remain in your Jar between Rinses. Set your Jar in a low-light, room temperature (70° is best) location.
4. Rinse and Drain (repeat steps 3 + 4) again 8 - 12 hours later.
5. 8 - 12 hours later your seeds will have the beginnings of little tails (sprouts). Add 6 cups of water (spring, purified or tap - your choice) to the sprouts and place the jar in the usual low-light, room temperature (70° is best) location for 2 days.
6. Pour liquid - this is your Rejuvelac - into a glass and drink some! Refrigerate the remainder until ready to drink or use in a recipe.
7. You may make more Rejuvelac by repeating step 3 and then adding 1 quart of water. Place your Jar in the usual location and culture your Rejuvelac for 1 day - then follow step 6 again.
Your sprouts are now pretty much spent, so toss ‘em to the critters (squirrels, rabbits, birds and many other outdoor creatures love sprouts) or compost them - or - throw ‘em in the garbage - it’s nice to add a little organic matter to a landfill though, don’t you think?
Carmella's Notes:
~ You can make rejuvelac out of other grains too, but wheat and rye are the most commonly used. My last batch was made with sprouted quinoa, and it turned out great.
~ If you only want rejuvelac in order to make cheese, you might want to cut the recipe way down. I'm experimenting with freezing the left-over rejuvelac for future usage. Hopefully it will still work! *fingers crossed*
Alright! Now this is the part where it gets really fun and interesting!
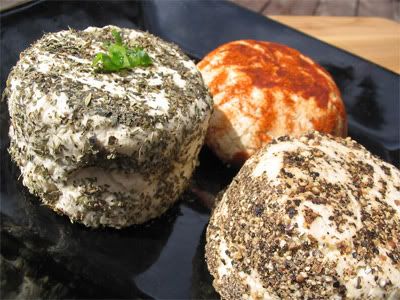
You get to come up with whatever flavors you want: chive, sun dried olives and fresh basil, rosemary and thyme, or jalapeño pepper. Mmmmmmm... So many variations to play with! For my part, I opted for the following...
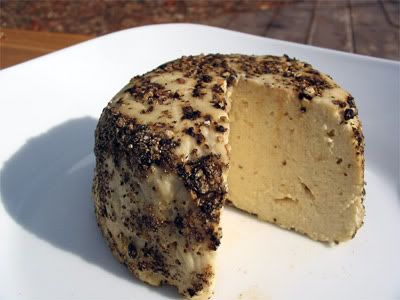
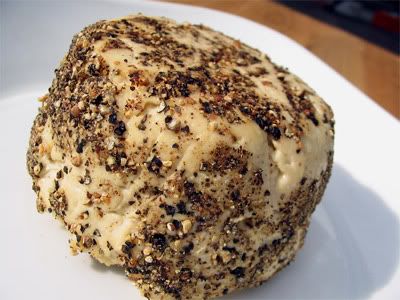 Cashew Cheeze au Poivre
Adapted from a recipe by Chad Sarno
1 cup Cashew Cheeze
1 tbs nutritional yeast, small flake
1/4 tbs onion powder
1/8 tsp nutmeg
1/2 tsp sea salt
---
Coarsely crushed peppercorns for the crust
 Place first 5 ingredients in a bowl and mix well with a spoon.
Shape the Cheeze mixture into a round or press firmly into a small container or bowl lined with plastic film.
While still in the pan, sprinkle the crushed peppercorns on top. Allow to chill for at least 12 hours or until it firms up.
When firm, demold, turn over and transfer onto a plate. Sprinkle more peppercorns on top and sides.
Store in fridge in airtight container for up to 3 or 4 days.
 Herb Cheeze
Adapted from a recipe in Charlie Trotter's Raw
1 cup Cashew Cheeze
1 tsp minced green onion
1/4 tsp lemon juice
1/2 tsp nutritional yeast, large flakes
1/4 tsp sea salt
1 tsp chopped fresh basil (or 1/2 tsp dried)
1 tsp chopped fresh thyme (or 1/2 tsp dried)
---
Dried basil and thyme for the crust
 Combine Cashew Cheeze, green onion, lemon juice, nutritional yeast and salt in a bowl, and stir until well mixed. Add fresh or dried herbs and stir until well distributed. Taste and adjust salt, if desired.
Shape the Cheeze mixture into a round or press firmly into a small container or bowl lined with plastic film. Sprinkle
dried herbs on top. Allow to chill for at least 12 hours or
until it firms up.
When firm, de-mold, turn over and transfer onto a plate. Sprinkle more dried herbs on top and sides.
Store in fridge in airtight container for up to 3 or 4 days.

Garlic Paprika Cheeze
1 cup Cashew Cheese
1/4 tsp lemon juice
1/2 tsp nutritional yeast, large flake
1/4 tsp onion powder
3/4 tsp garlic powder
1/4 tsp sea salt
---
Paprika for the crust
Combine first 6 ingredients in a bowl and stir until well mixed. Taste and adjust salt, if desired.
Shape the Garlic Paprika Cheeze mixture into a round or press firmly into a small container or bowl lined with plastic film. Sprinkle paprika on top. Allow to chill for at least 12 hours or until it firms up.
When firm, de-mold, turn over and transfer onto a plate. Sprinkle more paprika on top and sides.
Store in fridge in airtight container for up to 3 or 4 days.
Oh, and have I mentioned that nut cheeze even freezes well?
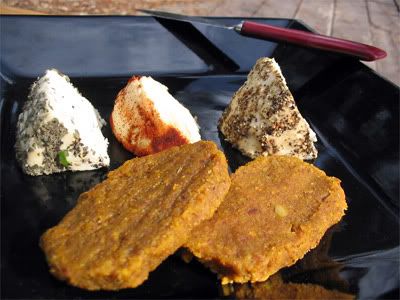
If you don't dig the round shape, simply store the mixtures in a container 'cream cheese style' or perhaps make truffles like the talented Cheflandria ...
Voila! The perfect snack or party treat!
 Say Cheeze! (Can you tell I'm already hooked!)


That's amazing! I'm so excited about it and cannot wait to make it! Thanks for bringing raw cheezes to life!
ReplyDeleteHugs! XOX
Seriously Carmella, you've got to stop it!! I've got 42 days left of this juice feast! ;) ;)
ReplyDeleteI can't wait to have a little get-together and make this as an appetizer with raw crakers! It looks just lovely and I'm sure tastes even better!
xoxo
Wow! I am really blown away! You can just tell how much this looks (and most likely tastes) like the real thing. Your presentation makes it even more amazing. Thanks for sharing the recipes and tips. Always a bonus!
ReplyDeleteI also enjoyed reading about your healthy attitude towards transitioning to raw foods early on - so many people feel pressured by percentages that the process becomes less positive. Hopefully anyone struggling with this issue will read your post.
thank you so much for this post and for being a blogger! i have wanted to tell you for awhile that i LOVE your posts!!!
ReplyDeletethanks for being such an inspiration!
MUCH LOVE
Sheer talent!!! Carmi, these are unbelievably amazing! :-)
ReplyDeleteYou guys are making my heart swell! Thank you!!! I'm the one who feels blessed to have such a medium that allows me to share with you all the yummy food we've been enjoying.
ReplyDeleteLinda, you're cracking me up! ;-) 42 days to go? *eek* Hang in there, girl!
Hi, do you have to use the nutritional yeast, and if not, what can be substituted? Thanks.
ReplyDeleteAlso, the recipes are fanatastic, keep up the great work.
Thanks Catherine! ;-)
ReplyDeleteThe nutritional yeast gives fermented cheese an extra cheezy flavor. I don't really know what it could be subbed with. I'd say just give it a shot; I bet it would still be tasty without it.
Hi, can you clarify your rejuvelac instructions? Are you sprouting for 8-12 hours or 16-24? Since the phrase "8 - 12 hours later" is at the end of step 4 and the beginning of step 5, it's a little confusing.
ReplyDeleteThanks for posting this, I'm just discovering your blog and loving it!
-Josh
I LOVE the look of these cheeses! Your step by step instructions are awesome and even I think I can give this a go. I will let you know when I've made some (need to try and find miso first though!!).
ReplyDeleteThanks for posting this.
:)
Josh,
ReplyDeleteI know, it does sound confusing. Basically, you need to sprout the grains for about 2 days (might be more or less depending on your house temp and what grain you choose to use), rinsing the grains well every 8 to 12 hours or so. You know it's ready once little tails start to appear. You can then move on to the next step, i.e. add water to the sprouts and let sit for 2 days.
Jeni,
Making cheeze really as complicated as it may look. All you need is a little patience... ;-)
Enjoy!
Quick question :)
ReplyDeleteAfter you let the cheeze sit and culture for about 16 hours, do you scrap off the outside of the cheeze (the part that is discolored), or do you massage it all into a ball shape including the discolored outside part? What exactly do you do when you take off the cheesecloth?
Thanks for your help :)
Hi,
ReplyDeleteI usually just fold in the discolored part.Once the cheeze is done fermenting, I just scrape the the mixture off the cheesecloth, separate it in however many different cheese flavors I want, say 2 or 3, then I fold in the other ingredients. I then either put the mixture in a bowl lined with plastic film or shape it in a round. I let it sit in the fridge for the cheeze to firm up and the flavors to blend and voila!
Enjoy!
Sounds great! Thanks for your help, I can't wait to try this out :) I am hoping the plain water works well. Might try the miso also, how much would you recommend? Sorry, I forgot to ask that last post...
ReplyDeleteStacy
I'm making this tomorrow. I think I'll try to shoot it, but I don't think it will be as pretty as your picture!
ReplyDeleteI've been wanting some really good cheeze recipes.. I think even my omnivorous father in law will like these...
ReplyDeleteThanks so much
Aran
What exactly is a probiotic capsule? Do you mean the supplement kind or is it something special for cheese?
ReplyDeleteSivartM,
ReplyDeleteYes, probiotics are those enzyme supplements you can find in most health food stores. They usually come in capsules, but also in powder form.
this is SO amazing! i made it and can't believe how totally great this is:) i also froze some that i saved and all i had to do was take them out of the freezer, put them on a plate, drizzle oil on top and they were just as amazing:) BTW carmi, have you ever made this with another kind of nut such as brazil nuts, sprouted almonds with skins removed, or anything else? once again, thanks for a totally amazing gift - i will be making this lots:)
ReplyDeleteHi Sarah,
ReplyDeleteSo glad you're enjoying this as much as we do! I haven't had a chance to experiment with other nuts yet other than my initial fooling around with seeds/almonds which didn't turn out so well, but then again, it was a completely different technique.
Please do keep us posted on your findings!
I've made the cheese but I have some problems...
ReplyDeleteFirst of all:
- I used quinoa rejuvelac. I followed every step of the process but the quinoa didn't sprouted and the final product wasn't very fizzy. It didn't taste very bad but it still didn't had that lemonade taste.
- after almoust 24h of chilling in the fridge, the cheese is still moist. I can't cut pieces, it's more like a cream cheese but with some texture. I was wondering if you chill it in the fridge or in the freezer.
- The cheese tastes...weird! Mostly like the rejuvelac! I made all of your three versions: garlic-paprika,herb cheese and au poivre. When I mixed the ingredients it tastes wonderful but now...
I don't know, I'm very dissapointed. Could it all went wrong because of the rejuvelac? Or the probiotics weren't active?
I would be grateful if you could answer to my questions. I want to eat that cheese so badly!
Hugs!
Ina,
ReplyDeleteSorry to hear that your cheeze experiment didn't go smooth. ;-(
I'm thinking that the rejuvelac might indeed be the culprit. Quinoa normally sprouts super fast so the fact that it didn't sounds like it wasn't fresh or something.
That, in itself, shouldn't make the cheeze 'bad' (unless the 'dead' quinoa spoiled the water in which it was soaking) as you could have used water instead of the rejuvelac. The only difference with water is that it takes a little longer for the cheeze to ferment.
I guess it's possible that the probiotics weren't active, but again, it would have only meant a longer fermentation period.
In regards to the texture, it may be that the ratio of rejuvelac to cashews was too high. This recipe normally gives me a firm cheeze. Oh, and I let it set in the fridge.
Having said all this, I hope that your cheeze is edible. If the final product (once seasoned) tastes good to you, then it's probably fine.
And please don't be put off by this unsuccessful experience! Nut cheeze can be so out of this world!!!
The cheese sounds good. Have you ever tried mixing in the seasonings before fermenting?
ReplyDeletethese are some things i am amaze to know, you rock.
ReplyDeleteLivebot,
ReplyDeleteI haven't, no. I don't see why not though, come to think of it! It would definitely be worth experimenting with.
Keep us posted on the results if you do!
It's delicious! I used the miso instead of probiotics (cheaper that way) and turned it into the herbed cheese. I didn't even wait for it to "set up" in the fridge, just ate it on a raw cracker.
ReplyDeleteI am a little curious about a couple things... Firstly, I'll say now that I know very little about cultures & the fermentation process. With that, I worry about this cheese becoming contaminated as it is being cultured. Is this even possible? Does the cheesecloth cover protect the cheese enough? I worry about cultures.. especially after having a bad experience with kombucha.
ReplyDeleteSecondly, does the rejuvelac simply speed up the process, or does it also add to the flavor of the cheese?
Lastly, when preparing the rejuvelac, after the sprouting process, does the jar of grain & water need to be covered loosely or airtight?
Thanks :).
Hello,
ReplyDeleteCan anyone tell me how much miso to substitute for the probiotics? Also, is there a more/less suitable variety of miso? I also have natto spores, which I believe are also fermenters. Does anyone have experience with those? Much more expensive though, so would prefer to go the miso route.
Thanks very much,
Tal
Your blog is so outstanding. Thanks for this particular post. I bookmarked it ages ago and just came back to consult during my own cheese making experiment.
ReplyDeletebtw adding a bit of black truffle salt works wonderfully if you like a stronger cheese...
I recently made Chad Sarno's cheese using probiotics
ReplyDeleteMy Take on Chad Sarno's Cashew Nut Cheese
and was excited to try yours with Quinoa rejuvelac instead, since vegan probiotics are not available here in Tokyo, and quite expensive to have shipped, too.
I have to say the Quinoa cheese came out even better than the original probiotics recipe: realllly stinky, almost like a blue cheese, but I love it that way:) and will definitely make it again.
It seems a shame to have to throw the Quinoa sprouts out after only one use. I added more spring water and they seemed to make more rejuvelac....how can you tell whether it's safe to use without tasting it? Any way to keep it going like bread starter?
Thanks a lot!
William
Ooopsie! Looks like I've fallen behind in responding to your comments! Sorry guys!
ReplyDeleteOK, let's see...
Coletrane,
I really don't know much about contaminated cultures. All I know is that I've made raw nut cheese many may times and never had an issue.
I believe the cheesecloth prevents debris/bugs to get into the culture during the fermentation process. This is why it is also used while preparing rejuvelac.
The rejuvelac mainly speeds up the fermentation.
Tal,
I've never worked with miso in nut cheese as I always seem to have probiotics on hand. I'll make a mental note to try it to see the difference though. I think I'd opt for a lighter colored miso so that it doesn't affect the final result.
William,
Raw cheesemaking in Tokyo eh? Cool! ;-)
Yes, I love the quinoa rejuvelac too! So easy and soooo delicious!
You can at least do one more batch of rejuvelac; in fact, this one should only take 24 hours of culturing. Rejuvelac should have a pleasant, tangy lemony smell. If it smells bad to you, then I would throw it away.
By the way, Russell James uses only water and probiotics in his (awesome!) Cheese Ebook and it works quite well. You just need to be a little more patient as it takes longer to culture.
Many thanks from Greece! Everything looks yummy!
ReplyDeleteHello!
ReplyDeleteJust about to season up our first ever batch, sooo excited!
Quick question, did anyone try freezing spare rejuvelac?
Is that likely to be a no-no?
Thanks in advance!
Emu,
ReplyDeleteI've tried freezing rejuvelac but it lost its fizziness in the process. I'm no rejuvelac expert but I also thought it smelled not so inviting.
I'd definitely recommend making your cheeze with filtered water instead. It will only take an extra 24 hours or so will be just as yummy!
Thanks for the ideas. I made the cheese, turned out soft, but great taste. May need more probiotics next time. Is there a way to make strawberry cream cheese? Would love to hear ideas.
ReplyDeleteTHanks again.
Hi there,
ReplyDeleteThanks for sharing your cheez recipes!
I was wondering if you've experimented with aging your creations. Do you just need to keep it airtight for longer? Some folks are aging their cheez for 3 months or longer before trying it and it turns out wonderful!!
Take care,
Mark
Have a batch curing as we "speak". Just went raw this week after being vegan for 5 years. Don't remember which blog I followed to this post, but thanks for the recipe. Wish me luck.
ReplyDeleteHello, I'm most intrigued/exited about the recipe& I'm certain the cheeee would come our delicious! Thank you for sharing the recipe. A question: how strong are the probiotic capsules you use? I'm not sure which ones to get - there seem to be anything from 6 to 20 or more billion per capsule...? Thank you!
ReplyDeleteSorry guys for not responding sooner but I didn't see your comments until a couple of days ago. ;-(
ReplyDeletehealing123,
For a firmer cheeze I'd recommend to place a weight (I use a glass mason jar full of water) on top of it. It will hep squeeze out additional liquid.
I've never tried to make strawberry cream cheese but I bet it would be simple enough. I would add some finally chopped strawberries to the basic cultured cheeze and perhaps a squeeze of orange juice.
Mark,
I haven't really experimented with aging nut cheeze. I know that Russell James does for an extra 2 weeks or so in the fridge. Not sure if it's in an airtight container or not. It it isn't it would form a crust on the outside.
Matt,
All the best on your raw journey!
Anonymous,
I don't always buy the same brand of probiotics so the strength varies. The one I have right now has 12 billion per caps. I don't think it really matters that much; a stronger probiotics means that your cheeze would be ready sooner. I guess that a good rule of thumb is to keep a close eye on the cheeze and start tasting it after about 16 hrs or so of culturing.
What vegan probiotics do you find work well?
ReplyDeleteJanet
Janet,
DeleteI've never used vegan probiotics so can't be of much help. Sorry!
Hi! I was wondering whether it's possible to make this vegan cheese using coconut instead?
ReplyDeleteThank you!
Hum, not sure. To me it would then be similar to Coconut Yogurt. (See post here: http://thesunnyrawkitchen.blogspot.com/2012/12/how-to-make-coconut-yogurt-and-coconut.html)
DeleteI'm thinking that you may have more success using coconut for another type of vegan cheeze. You can see several renditions of it here: http://carmellassunnyrawkitchen.com/raw-food-recipes/free-recipes/
Hope this helps!
Carmella
what is the difference in taste between before and after it has fermented? I used plain water and left it for 24 hours but i don't know if it has fermented enough because it didn't change in color. Thanks
ReplyDeleteFarnaz,
DeleteIf you didn't use rejuvelac you will need at least 36 to 48 hours of culturing. When done the cheeze should have a slight tangy flavor. How long you leave it depends on how pronounced you like the tartness to be.
Enjoy!
it's already in my fridge. Should i put it back on the counter or is it too late? Btw, i used 50 billion probiotic capsules, would that make any difference? Thank you so much! Btw, i absolutely love your website.
ReplyDeleteThanks for the kuddos!
DeleteThe more potent your probiotics the quicker the culturing for sure. Did the cheeze have a pleasant tart taste? If it wasn't quite mature enough you can definitely just pop it back out of the fridge and leave it at room temp for a few more hours until you're happy with it. ;-)
Was the rejuvelac fine after it was frozen?
ReplyDeleteI feel it had lost some of its potency.
ReplyDelete