I have released four recipe books so far:

The Best of the Sunny Raw Kitchen
The Best of Raw Freedom Community
Delightfully Raw and
Deliciously Raw

These feature some of the most delectable creations to have come out of my raw kitchen and will appeal to anyone interested in a healthier diet, regardless of their level of knowledge and experience. From easy one-step everyday fare to more elaborate and involved gourmet dishes and layered cakes, they offer something for everyone and every occasion. Incredibly tasty smoothies, creamy and comforting warm soups, sexy salads, delicious nut cheezes, satisfying entrees and scrumptious guilt-free desserts...

Healthy food never tasted so good!

To learn more about my recipe books, click here!

Sunday, March 30, 2008

Recipe of the Week: The Best Banana Split Ever!

If you're a regular of The Sunny Raw Kitchen, then you've probably noticed that I went MIA. I was away at a Vipassana Meditation retreat, where I spent 8 days fasting my mind (meditating some 10 hours a day!) and somewhat my body (there was little raw food on the menu).

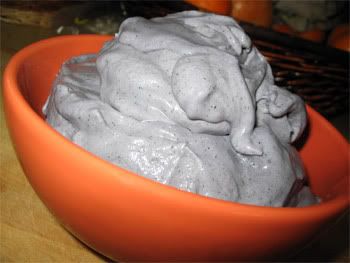
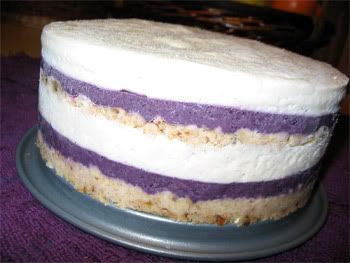
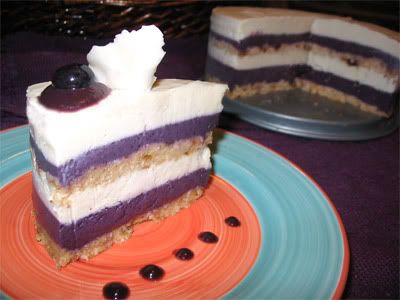
To my surprise, the scrumptious gourmet dishes I've been enjoying lately didn't come and haunt me relentlessly during my meditation hours, as I almost expected they would. There is one thought, however, that kept sneaking in there inadvertently from time to time: that of Heathy's lovely Blueberry Cardamom Ice Cream which I made shortly before I left. Of course, it was all gone by the time I got back (bad, bad Don!), so one of the first things I whipped up was a batch of plain vanilla and carob ice cream.

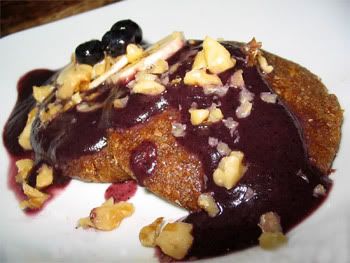
In a moment of sheer inspiration (and no doubt feeling particularly naughty and dessert deprived), I decided to serve these in a Banana Split - something I hadn't had since my childhood. Whoa! This was beyond delish and would cause any Dairy Queen to blush in shame!

The Best Banana Split Ever
Bananas (1 per serving)
Andy's Vanilla and Carob Ice Cream (or your favorite raw vegan Ice Cream)
Your favorite Chocolate Sauce, gently warmed up
Chopped walnuts


I'd been meaning to try the following recipe for ages. Totally outstanding in both taste and texture!

Vanilla Ice Cream Base:
Posted by andypdx on Raw Freedom Community

1 Cup cashews (no need to soak)
1 1/2 Cup water
1/3 Cup raw agave
1/4 tsp salt (+/-)
1/3 Cup raisins (This is the secret ingredient that imparts the rich/buttery flavor)
1 vanilla bean
1-2 Tbsp Cacao butter or Coconut oil or young coconut meat

Take all the above ingredients and blend in Vitamix for a couple of minutes...or at least until all the solids have blended away.

NOW, pour the mixture through a sprout bag. This will catch all of the tiny cashew/vanilla bean particles, and make the final product much more silky smooth.

Now, you have a perfectly good vanilla ice cream base, but who wants to eat plain ol' boring vanilla!?

At this point, I add any of the following to the base...

Carob (about 2 Tbsp)
Cocoa nibs (a small handful)
Raw cacao powder mixed with cocoa butter
Strawberries
Nuts
etc...

The exact quantity of each of the above ingredients will vary based on taste and the quality/moisture content of your ingredients, but I usually add anywhere from 1/4 to 1/2 cup total volume at this stage in the game.

Now, place the ice cream base and your flavorings back in the Vitamix, and blend just long enough to get everything mixed well.

At this point, it is best to 'pre-chill' the mixture. If you simply dump the mixture into the ice cream maker now, it won't set up properly, and it will be less firm than even soft serve. Place it in the fridge for a few hours, or if you've gotta gave that ice cream ASAP (trust me, I've been there!), put the mixture in the freezer for about 10-15 minutes. You want it to be cool, but not to the point where ice crystals are starting to form. (SPECIAL NOTE: do not use the ice cream maker 'bowl' to do the pre-cooling. The base will freeze to the bowl, and the batch will be ruined.)

When the mixture is sufficiently cool, pour it into the ice cream maker, and let it go! After about 20 minutes or so, it should be ready!

Carmella's Notes:
~ I used less agave than Andy calls for and closer to 1/8 tsp salt.

~ I didn't feel up to passing the mixture through a sprout bag. The texture was still awesome!

~ Andy was right about the raisins, they do give a delicious buttery flavor, however, they lend the ice cream a slightly darker shade than you'd expect for a vanilla ice cream.

~ As I don't own an ice cream maker (putting an early order for Santa right now, though!), I poured the mixture in ice cube trays. It did the trick. I could have blended the resulting cubes in the Vitamix but didn't bother.


For the Chocolate Sauce, I used Heathy's version which she says she makes all the time. It's easy to see why, it is fantastic! Her recipe will be going in the raw dessert ebook she's working on so I can't share it with you. However, Karen Knowler shared this favorite recipe of hers with her readers this Easter. Sounds mighty yummy!

Thick & Dreamy Chocolate Sauce
By Karen Knowler

Oh-My-God. That’s really just about all I can say.

Ingredients
• ½ cup raw chocolate powder*
• ½ cup agave nectar*
• ½ cup raw cashew butter*
• 1 teaspoon of vanilla essence

Directions
1. Simply place all ingredients into your food processor (this works better than a blender) and process into a thick runny chocolaty goo! It’s a miracle! About 2 minutes worth of pouring and whizzing for the most amazing creation ever.

RAW COACH TOP TIPS
• This is awesome as it is – just by the teaspoon (!) – but could be used as a dip for fresh strawberries or other decadent fruits, or as a drizzle for a fruit salad or raw cake or fruit pie.

• Freeze in ice-cube trays for instant cool chocolate chunks!

• Add one frozen chunk to a smoothie or nut milk for instant choco-ness!

• Why not add some raisins and/or nut pieces into the mixture for something a little more, um, “fruit ‘n’ nut”– like?

• This mixture should keep well and happy in the fridge (covered) for a few days without any issues whatsoever. (If it lasts that long).

• Oh, the possibilities are endless!

• PS: Who needs a copy of “How to Win Friends and Influence People” anyway?


Banana Split Assembly
Carefully slice a ripe banana in two, lenghtwise and place on serving plate or bowl.

Add a few scoops (or pieces) of vanilla and chocolate ice cream.

Drizzle with warmed up chocolate sauce.

Top with chopped walnuts.

Enjoy without a hint of guilt!

Carmella's Note:
Doing a bit of research, I just found out that the classic banana split is made with vanilla, chocolate and strawberry ice cream, pineapple, chocolate sauce, walnuts, sometimes whipped cream, and the infamous cherry on top. Ah well... Guess now I have no choice but to make some more. Dang!

Thursday, March 13, 2008

Recipe of the Week: Amazing Cauliflower Orange Dressing

I thought I'd post this week's recipe of choice early since I'm getting ready to head out of town for a little while.

Manu came up with a fantastic dressing over the weekend; my and Don's new favorite. Manu has whipped up 3 batches in 4 days which says it all... We would have never guessed there was cauliflower in there in a million years! A must try!


Amazing Cauliflower Orange Dressing

Yields about 1 1/2 cups

1/2 cup cauliflower
1/2 cup + 1 tbs lightly flavored oil such as sunflower oil
1 tbs raw sesame oil
Juice of 3 small oranges (or 1/2 cup)
1/4 tsp fresh garlic
1/2 tsp green onion (white part)
1/4 tsp paprika
2 tsp raw tahini
2 tsp agave nectar
1/2 tbs lemon juice
Salt to taste

Blend in high speed blender until smooth.

Enjoy!

What's Uncookin' Good Lookin'? - Episode II

It's definitely starting to look like Spring around here. All the unmistakable signs are there: more sunshine, warmer temps, melting snow and longer days. Hee-hah! Bring it on, babe!

My enthusiasm for raw food prep has also returned. No doubt that the goodies coming my way in the past week or so has got something to do with it too. For one thing, our neighbors were kind enough to bring us fresh young coconuts from the big city. (Bless their hearts!) And after many a week of patiently waiting, there's also been the arrival of my orders from Really Raw Food and Caromacs, both of which had somehow been misplaced. Oh, and let's not forget raw nuts from Oh Nuts! (including shelled pistachios - Heavenly!) that got delivered at the wrong address! (Gee, maybe I should stay away from ordering on line! lol)

In any case, we've enjoyed LOTS of delicious foods since my last report, many of which were entirely new creations. Here are the highlights...

I love changes and breaks of continuity; we so easily get stuck in a rut, be it in regards to food or countless other aspects of our lives. After almost a year and a half of daily green smoothies, we've been finding ourselves enjoying fruit salads or beverages with a nut/seed milk base. For instance, this morning's brew was sesame milk, bananas, blueberries, cacao powder, carob powder, maca, vanilla and dates. Delish!

We scored on lovely, ripe pineapples - a rare treat - during our last trip to town, so have been feasting on those too. Have you ever noticed how sometimes your tongue kinda hurts afterwards? Well, this time, it seems that I overdid it, as the whole underneath of my tongue was so painful that I had to stay away from acidic stuff for several days. A little trick someone gave me on Raw Freedom Community (aren't forums awesome?) was to put a bit of soda on the afflicted areas. Sure seems to have helped.

I also thought it would be fun to have a brunch once in a while. You know, so we get a chance to try some of the raw breakfast recipes floating around. I decided to make Ani Phyo's Breakfast Cakes, which I served with blueberry sauce, banana slices and chopped walnuts. The main ingredients for the cakes being flax seeds, I must say that I had my suspicions that the result would turn into a gooey mass. To my surprise, it wasn't the case at all. Although the taste and texture were interesting, I found the cakes a little too sweet and heavy for me.

Soupwise, I made a few old favorites such as The Pilgrim Soup which I recently was sharing with you, my famous Spinach Soup (Ooops - I had jotted down the recipe somewhere, but can't find it just now) and the Cream of Leek. I also wanted to try again the Creamy Thai Coconut Soup that Manu created a few weeks ago, especially since it got some rave reviews.

Some of the main courses we enjoyed include Cherie Soria's delicious Mushroom Stroganoff, my Spinach & Cream Pasta Casserole, and crackers with the Raw Deviled Egg-less "Egg" Spread and another simple but tasty spread made with cashews, garlic, lemon juice, salt and thyme.

I also made Raw Food Real World's Thai Wraps once again. As I didn't have tamarind, Manu came up with the following dipping sauce instead. We all thought it was delish and that it would also make a fantastic dressing.

Coconut Dipping Sauce or Dressing
1 cup dry coconut
2 stalks celery
6 leaves basil
Small garlic clove
1 tsp red pepper flakes, ground
1 tbs sesame seeds, ground
3 tbs sesame oil
2 tbs honey
1/2 tsp salt
2 tsp lecithin

Blend in high speed blender until smooth. Strain and serve.


Speaking of Manu, he went a little wild in the kitchen yesterday and whipped up our entire dinner. First came the best tomato soup I've tasted so far. He didn't keep track of the exact amounts, but the ingredients were tomatoes, avocados, cucumber, red pepper, celery, green onion, garlic, honey, salt and a touch of apple cider vinegar. The soup was topped with a thick, savory cream consisting of cashews, lemon juice, garlic, salt, thyme and nutmeg. Yummo!

He also made an outstanding dressing which will be featured as my Recipe of the Week. Amazing stuff! And the 'pieces de resistance'... Pizzas! These were incredibly tasty! Few ingredients, yet astounding flavors in the spirit of Italian cuisine.


Viva Italia Pizzas

Pizza crust of choice (we used this veggie crust)
Cashew Cheese
Bruschetta Style Tomato Topping
Black olives, slivered
Basil, finely slivered

Cashew Cheese
Inspired by Chad Sarno's recipe here

2 cups cashews, soaked 12-14 hours
¾ teaspoon probiotics dissolved in 1/2 cup fresh rejuvelac
2 tbs nutritional yeast, small flake
½ tbs onion powder
¼ tsp nutmeg
1 ½ tsp sea salt

In high speed blender, blend the soaked cashews with probiotics and rejuvelac, until smooth. Pour mixture in a bowl lined with cheese cloth, cover with a towel and leave in warm place for 14-16 hours to culture.

When finished culturing, mix in the remaining cheese ingredients by hand; nutritional yeast, onion powder, nutmeg and sea salt.


Bruschetta Style Tomato Topping
2 large tomatoes, seeded, skinned, and cut into cubes
1 1/4 tsp finely chopped onion
1/8 tsp minced garlic
1/4 tsp salt
1/4 tsp thyme
1 tbs olive oil

Cut tomatoes in quarters and de-seed them. Pass a very sharp knife against the edge in order to remove the skin. Cut tomato flesh into small uniform cubes. (Should yield about 1 1/4 cups)

Form garlic, salt and thyme into a paste. Mix with other ingredients.


To assemble the pizzas:
Spread a generous layer of Cashew Cheese on the crusts, followed by the Tomato Topping.

Warm up in the dehydrator at 110 degrees for 1 hour.

Just before serving, top with slivers of black olives and basil.


And lastly, we certainly got our share of scrumptious desserts in the last week or so...

Cafe Gratitude's Coconut Cream Pie, which I've been meaning to try for ages. Yummo! (Man, how I love this book!!! Simply excellent!)


And my latest creation: Delight-full Chocolate Blueberry Cake (recipe posted here.)


Don goes to me: "This is your best cake yet!" This line is starting to get a little old, but what can I say? They indeed seem to be getting better and better!

Here's a closer shot... Have I said it was absolutely decadent?


Phfew! We've been busier than I thought. I can feel another cracker n' spread week coming up. ;-) Actually, I just found out that I'll be going away to a meditation retreat for a little while. A forced vacation from uncooking I guess. *sigh* Oh well. The kitchen will still be there when I get back.)

Talk again soon...

Monday, March 10, 2008

Everything You've Always Wanted to Know About... Me!

Alright! Alright! Perhaps not EVERYthing, but interesting tidbits that I haven't shared with you yet. Why these sudden confidences? Because I was tagged by Shannonmarie of Rawdorable yesterday so now I get to reveal 5 things you don't already know about me.

Okay, here we go...

Number 1:
As a teenager, I was a bit of a rebel. I'd dress in oversize men's and used army clothes, and would get all kinds of weird hairdos. As I lived in a small town in the boonies at the time, it certainly didn't go unnoticed. Among other things, in the space of 3 years, I got an Iroquois cut (my mom sure was thrilled about that one! NOT!!!), hairdos a la Corey Hart, a la Cyndi Lauper, and not to forget Robert Smith from The Cure. I have done my share of damage to the ozone layer; I'd use so much hairspray for the latter that I was on the verge of turning into the flying nun every time the wind picked up! lol

Ahh! The good ol' days! I've always hanged on to the photo booth pics I took, thinking it would be fun to show my grandchildren one day. Not sure whether I'll ever get the chance as the clock is ticking away, but it's still a blast whenever I dig them out.


Number 2:
You know how, looking back, you can see that certain decisions had a major impact on the way the rest of your life unfolded? It was the case for me when I participated in an exchange program back in 1988. I went to Wilson, North Carolina where I lived with a family who welcomed me as one of their own for close to a year.

During that time, I attended and graduated from the local high school, and got to learn about the American culture first hand. Not only did this amazing experience allow me to become fluent in English, but also to meet a bunch of other exchange students from around the world; some of which I even visited later on. As it turned out, this was only the beginning, as I've ended up spending a big chunk of my life outside of Quebec, where I was born.


Number 3:
At age 19, I put on my back pack and took off traveling for a year, mostly in Ireland and the rest of Central Europe. The Berlin Wall fell right around then, so these were interesting times to say the least. Everyone I'd meet in youth hostels were talking excitedly about how 'history was being made,' in the countries that used to be hidden behind the Iron Curtain. So instead of spending a month in Spain as I originally intended to do, I headed out for Poland, Czechoslovakia, and Hungary. Yet another experience that has changed the course of my life in a definitive way. I returned to Europe in 1995 in order to study history at the University of Swansea in Wales.


Number 4:
Before moving to British Columbia in 2000, I used to make a living with the didgeridoo. Incidentally, I first heard it played at a gig in Wales, and was so enthralled by its sound that I decided to learn how to play it. Upon my return to Montreal, I met someone who imported me a traditional Australian didgeridoo - a branch from an eucalyptus tree that was naturally hollowed out by termites. (Isn't Nature incredible?)

Eventually, I started to make didgeridoos out of ABS pipes, which I painted and sold at festivals and art shows. Besides teaching how to play didge to children and mentally handicapped people, I also performed with other musicians and practiced sound healing.


Number 5:
Before playing with food, I used to play with yarn and needles. I'm particularly fascinated by lace knitting. It is so delicate and magical, I just adore it! It made me feel like a spider spinning her web. I've knitted tops, ponchos, hats, scarves, socks, sweaters, doilies, and even pants. I also began working on a couple of shawls - my most challenging projects by far - but my left wrist started acting up due to carpal tunnel syndrome. Sadly, I had to put my needles away, and haven't knitted in almost 2 years now. On the good side, this has allowed me to channel my creative energy towards raw food prep instead. I gotta say that it surely is nice to be able to enjoy my creations after only a few minutes or hours. I do miss knitting, however, and hope I'll be able to do so again one day.

Wow! Talk about time warps... I feel as though this all happened in a past life! Alright! Now that I've bared it all, I get to tag 5 other bloggers. Audrey, Rawkin, Jessica, Sara and Anthony, your turn to tell us a bit more about yourselves! ;-)

Sunday, March 9, 2008

Recipe of the Week: The Pilgrim's Soup

Here's a delicious soup Don created last spring, using Jerusalem artichokes.* "How come I haven't shared the recipe yet" you ask? Good question! My original intention was to include it in my "Best Of The Sunny Raw Kitchen" ebook, except artichokes vanished from the shelves on my local health food store before I was able to take a picture of the soup. Then I guess I got caught in the constant whirlwind of exciting new raw creations and forgot all about it...

Anyhow, we've had the chance to make this soup a number of times in the past year, experimenting with different variations, and it always turns out delish.

* The Jerusalem artichoke, also known as sunchoke, is actually a type of sunflower native to North America. It's tuber is crisp and has a lovely subtle taste reminiscent of water chestnuts: kinda sweet with an earthy-nutty flavor.


The Pilgrim's Soup

Serves 2 to 4

3 or 4 celery stalks
½ avocado
2 green onions
1 sm. zucchini
1 med. Jerusalem artichoke (gives it a slightly sweet and earthy taste...yum!)
handful of parsley
handful of cilantro
1 small tomato
1 tablespoon miso
1 tablespoon tahini
2 cups water


Variation I
Add:
2 celery
2 cups spinach

Variation II
Use:
Part almond butter, part tahini
Part cuke and part zucchini
Garlic

Variation III
We've made it once with left-over sauerkraut juice and water from soaking arame instead of regular water. OMG, was it ever fantastic!


Blend everything until smooth.

Warm up gently on the stove while stirring constantly until lukewarm.

Enjoy!


Carmella's Note: No need to peel the artichokes before using it; simply scrub it well under running water and cut off any dark spots.

Monday, March 3, 2008

Recipe of the Week: Layered Blueberry & Cream Cake

There was a serious shortage of coconut oil in my cupboards for the past few weeks as I was anxiously waiting for a raw food order to arrive. You know how it goes: "It might arrive in the mail tomorrow so no point in buying some at the local HFS for twice the price, right?" Talk about creating havoc in a kitchen though; the list of dessert recipes I wanted to try was getting longer by the day, I tell ya!

When the order finally made it to my neck of the woods (hee haa), I decided to celebrate with Mishka's Blueberries and Whipped Cream Cake - an ingenious variation of my Strawberry Shortcake that she made using blueberries. Since I still have tons of blueberries in the freezer (yay!), how could I resist? (Ahhhhh! Me and desserts...)

I was in the mood to get fancy, so I assembled my cake in several layers. Unlike Mishka, I used only one batch of whipped cream and opted for the blueberry filling from my Bliss-full Blueberry Cheesecake recipe.


All I can say is "Wow!" The Strawberry Shortcake is one of my personal favorites so I admit that I wasn't the most objective of recipe testers. (I just LOVE the cake layer - so light and subtly flavored.) But even Manu was impressed! I figured he deserved an extra big piece since he did such a good job with presentation.


Layered Blueberry & Cream Cake

This recipe is for a 7" diameter springform pan

Cake
3/4 cup well packed soft dates, chopped
1 cup loosely packed left-over pulp from making milk (wet pulp is fine) or ground almonds*
1 cup dried coconut
1/2 cup cashews, ground
1 tablespoon lemon juice
1 tablespoon vanilla extract
Pinch salt

* If using ground almonds, you may need to add a little water for moisture.


Blueberry Layer
1 cup fresh or frozen blueberries (thawed)*
1/2 cup dry cashews, finely ground
2 tbsp melted coconut oil
1 tbsp melted cacao butter
1/8 cup raw honey or agave nectar (I used both)
1/2 tablespoon lemon juice
Pinch salt

*If using frozen blueberries, make sure they are well thawed and at room temperature to avoid the honey turning rock hard during blending.


Whipped Cream
1 cup cashews
1 cup + 2 tablespoons fresh coconut milk (simply blend 1 part dried coconut with 3 parts water in high speed blender)
3 tablespoons raw honey or agave nectar
1 tablespoon lemon juice
1 tablespoon vanilla extract
Pinch of salt
1/2 cup coconut oil, melted
1 tablespoon lecithin*

*Lecithin acts as an emulsifier. Look for lecithin (preferably non-GMO), in granules or powdered form, at your local HFS. If using granules, make sure to grind them up in a high speed blender of coffee grinder.

If you don't have access to lecithin, you can replace it with 1 tbs + 1 tsp psyllium flakes (less if you're using powder). Please note that the consistency won't be as fluffy and hold its shape as well at room temperature.


Blueberry Sauce:
1 cup blueberries, fresh or frozen
3 or 4 small soft dates, soaked


To make the Cake:
Place dates in food processor and process until a smooth paste forms. You may need to add a little water. Then add the rest of the ingredients and mix until smooth.

To make the Blueberry Filling:
Blend all ingredients in a high speed blender until completely smooth. Pour into a container and set aside in fridge or at room temperature until ready to assemble.

To make the Whipped Cream:
Blend all ingredients except coconut oil and lecithin until smooth. Add coconut oil and lecithin and blend until thoroughly mixed. Pour into a container and set aside in fridge or at room temperature until ready to assemble.

To make the Blueberry Sauce:
Blend blueberries and dates in high speed blender until smooth. Add soaking water until desired consistency is reached.


Assembly:
Layered cakes always look so impressive, but don't be fooled; they aren't that hard to assemble at all. All it takes is a bit of patience (and of course time) while the mixtures set in the freezer before proceeding with the next layer.

10 Easy Steps for Assembling this Layered Cake

Step 1 - Grease a springform pan with a little coconut oil or line a large margarine tub with plastic film.

Step 2 - Begin by evenly pressing half of the cake mixture on the bottom of the pan. (At this point, you might want to have a look at my friend Mosaica's tip to save on assembly time!)


Step 3 - Top with 1/2 of the blueberry mixture. Set in freezer.


Step 4 - When firm, pour 1/2 of the whipped cream mixture and set in freezer.


Step 5 - When completely firm, form another cake layer. (This is particularly key at this stage, as you will need to slightly press the cake batter unless you're using Mosaica's trick explained further down.)


Step 6 - Top with the rest of the blueberry mixture and set in freezer.


Step 7 - Lastly, when firm, pour the remainder of the whipped cream filling and return to freezer.


Step 8 - When the cake is set, gently remove it from the springform pan.


Step 9 - Cut pieces with a sharp knife and place on a serving plate. (See Notes)


Step 10 - If desired, decorate with blueberry sauce and a few blueberries.


Mosaica's Tip:
My good friend, Mosaica, just gave me a super trick to save on assembly time. (Thanks, dear!) Once the bottom layer (cake) has been pressed, simply loosen your pan and gently take out the cake layer. Set aside (you can wrap it in a foil and put it in the fridge). This will later become the second cake layer. Next, tighten the hinges on your pan and press the second half of the cake mixture on the bottom. Top with the blueberry and whipped cream fillings, as per the instructions. Once the latter has firmed up, you can then place the cake layer that you have already pressed on top and proceed with the rest of the cake. She says this method really cuts down on freezer time and makes the second cake layer more even.

Carmella's Notes:
~ Leave the mixtures in the fridge or at room temperature during the assembly process so that these can pour easily and evenly. If the fillings have set too much, simply melt down over a hot water bath while stirring.

~ In order to obtain distinctive layers, it's key to let each set in the freezer before applying the next layer.

~ To help keep the layers 'clean' while cutting the cake, put your knife under running hot water then dry it with a towel. Proceed to make a cut. Repeat this step between each cut. (Yah, yah, I know it sounds like a lot of work, but hey, remember that we taste with our eyes first!)

~ For a simpler version of this, put the cake layer, followed by the blueberry layer. Let set in the freezer. When firm, top with whipped cream. (In other words, skip steps 5, 6 and 7 and use the entire mixture for each layer.) Set in the freezer until ready to serve. If desired, decorate with blueberry sauce and fresh blueberries. Perhaps not as impressive but definitely still as delicious!

Enjoy!!!


Sunday, March 2, 2008

What's Uncookin Good Lookin'?

A couple of evenings ago, as I was enjoying a much deserved rest after a busy day at the kitchen counter, I was struck with an idea for a new series of posts. It occurred to me to keep you posted with weekly updates about what's been going on in my sunny raw kitchen. Not only would it be an opportunity to put the spotlight on my recent culinary experiments, recipe testing and those special gems I keep coming back to again and again, but also to give those new to raw foods a sense of what eating a mostly fully raw diet really looks like.

So without further ado, here's what's been uncooking around here...

I find that my creative juices have slowed down to a trickle lately. Actually, I should mention that Life has been presenting me with my share of challenges in the last little while, so my energy has been naturally going where it's needed. In practicality, this has meant a great deal of inward focus (read - mostly meditating and not doing much.)

In spite of what it may look like, we don't have gourmet feasts every single night. (Alright, alright, very nearly perhaps, but not always!) As much as I love preparing food, it's nice to take a break and stick to the simple stuff once in a while, especially in times like these.

As some of you may know, raw soups are a daily affair around here. This week's concoctions included Cucumber Avocado Dill Soup, the lovely Mushroom Soup Heathy and I came up with when she visited last fall (shown on the left), and two of Manu's creations: Creamy Arugula Soup (recipe below) and another highly unusual but absolutely delicious one featuring parsnip, sauerkraut and red pepper. (Sorry, no recipe just yet as we'd like to give this one another try to nail down the amounts to the T.) Oh yeah, we also had baby and mature bok choi coming out the yin yang, so on Leah's suggestion, I made a simple miso broth (white miso, water, seaweed, fresh ginger root, garlic) which I served with slivers of bok choi, chopped red pepper, green onion, and cubes of avocado. Mmmmmm

Manu's Creamy Arugula Soup

Serves 3

2 cups arugula
3 cups spinach
2 cups sesame milk*
1 cup almond milk
1/2 avocado
1/4 cup oil
2 tbs light miso
2 tbs maple syrup
1 tbs honey
1/4 tsp thyme
1/4 tsp black pepper, freshly ground
1/2 tsp coriander seeds, freshly ground
1/4 tsp salt

* If you don't have sesame milk already made, blend 2 tbs of tahini with 2 cups water. Alternatively, you could use only almond milk although you may have to cut a little on sweeteners, as they are there to counterbalance the bitterness of the sesame.

Toppings
1/2 avocado cubed
1/4 cup red bell pepper, cubed
Parsley, finely chopped
Freshly ground black pepper

Blend all broth ingredients until smooth. Gently warm up, stirring constantly on medium heat. In the meantime, divide toppings into 3 bowls. Pour broth onto toppings and enjoy!


As I was just saying, our main courses this week remained for the most part real 'no brainers' that can be quickly whipped up. Crackers n' spread have been our snack of choice. I just love how you can make a spread or pate in but a few minutes and then be set for days! I was excited to try some of the recipes in Kristen Suzanne's Raw Sides & Snacks ebook and opted for her Olive Tapenade and Sea Side Cottage Spread. They were both excellent. I can see why the former is one of her favorites. It is totally awesome both on crackers or as a dip for veggies.

I did venture out a bit to make my rendition of Naomi's Pizza Supreme which I'd been meaning to try. I used a buckwheat crust I had already made, red pepper instead of green, a bit of garlic in the mozzarella and this Pecan Sausage recipe. (Mmmmmm... this stuff grows on ya!) I've never had sausage on pizza in my SAD
days, so didn't really know what to expect. It was delish anyhow!

Since our reserve of crackers had taken a serious toll, a 'D day' (that's a dehydrator day for the uninitiated)
was called for. Not to mention that Manu has been looking forward to having one of those ever since he moved in the cabin next door. Ahhhhhhhh! Feels so good to play in the kitchen, especially when I don't have to do the grub work and can focus on the fun stuff (thanks to my two assistants!) Aren't I a lucky girl!!!

I was debating whether I should make nori snacks, as these are highly addictive and we tend to go through these in no time at all (but it is soooooo worth it!) I used to make the original version I got from Raw Pleasure Australia's free ebook, but lately have been using Rawvolution's Sunflower Seed Cheese as the pate. (Simply divine!!!) The one thing about those, however, is that it can be time consuming to spread the pate on the nori sheets. However, Manu came up with an ingenious new trick that solved the issue beautifully. He dropped a big dollop of cheese in the middle of a nori sheet, put a piece of plastic film on top, and with the help of a rolling pin, spread cheese evenly and voila. Pure genius, I tell ya!

While Manu was busy rolling away, I made my all-time favorite: Onion Bread and finally got to try Cafe Gratitude's Almond toasts (soooooo good!!!) I also whipped up a couple of batches of Ani's Black Sesame Sunflower Bread (yet another staple around here). Actually, as it turned out, I misread the list of ingredients and put way too much salt in so, at the last minute, decided to make an extra batch. Flandria's Pajon Bread was also on my 'to make' list but I ran out of room. Guess it will have to wait until my next savory D Day.

Lastly, I prepared Cherie Soria's Crab Cakes which I've been raving about for a while now. If you haven't made these yet, you're up for a real treat! Man, are these ever good! Although I've enjoyed these crab cakes a umpteenth times before, it was my first time following the exact recipe for the tartar sauce. (I usually skip the capers and horseradish.) Anyhoo, yummy stuff!

Here's the recipe in case you've missed it...

Vegan Bay "Crab" Cakes
Recipe by Cherie Soria (as printed in Purely Delicious magazine)

Serves 6 (Yields twelve 1/4 cup cakes)

1/2 C. dried porcini mushrooms, soaked for 1 hr, drained and diced
1 1/2 C. zucchini, spiralized
1 1/2 C. macadamia nuts, ground
1/4 C. onion, finely minced
1/4 C. celery, finely minced
2 Tbls. nutritional yeast
2 Tbls. lemon juice
2 Tbls. red bell pepper, very finely diced
2 tsp. kelp powder
2 tsp. ground golden flax seeds
1 Tbls. ground psyllium
1 tsp. garlic, pureed
1 tsp. red jalapeno, minced (or substitute cayenne pepper to taste)
1 tsp. Himalayan crystal salt

1. Using a pair of kitchen shears, cut the spiralized zucchini into pieces about one inch in length. (A spiral slicer and a chef's knife are perfect for this task.)

2. Combine the zucchini and all remaining ingredients in a mixing bowl and mix well. Add a few drops of water, if needed, to form a firm dough.

3. Using a 1/4 C. measure, create small cakes, about one inch deep.

4. Place the cakes on a nonstick dehydrator sheet and place in dehydrator at 120 degrees for 1 hour; then turn over to dehydrate the other side for another 1-2 hours. (This temperature will not be too hot to destroy the nutrients and enzymes, since the dough has enough water to stay cool during this time.)

5. Serve with a generous serving of Cocktail Sauce and/or Creamy Dill Sauce.


Creamy Dill (Tartar) Sauce
1/4 C. cashews, soaked in water 4 hours
1 1/2 Tbls. lemon juice
2-3 Tbls. water, as needed
1/4 C. dill weed, minced
2 1/2 Tbls. capers (not typically a raw food)
2 Tbls. celery, minced
1 Tbls. horseradish
1 Tbls. red onion, minced
1/2 tsp. salt

1. Place cashews with lemon juice and enough water to form a thick, smooth cream.

2. Add remaining ingredients and pulse.

Mixture should have a slightly chunky texture. Serve over Crab Cakes.

Carmella's Notes:
~ For the crab cakes, I sometimes use a mixture of macs and cashews or only cashews.
~ I use the porcini soaking water as a base for that evening's soup. So tasty!


It's been rather uneventful on the dessert front, as I was still waiting for my order from Really Raw Food to arrive. We enjoyed the rest of Leah's yummy Layered Chocolate Mousse Cake most of the week. I also made Caramel Turtles, as I still had some chocolate coating sitting in the freezer from all the testing and re-testing for my Sunny Raw Kitchen ebook.

After 6 weeks of patient and yes, exasperated waiting at times, my RRF order finally got here last Thursday. Yippee! Turns out it was somehow misplaced. (shaking her head in disbelief) Anyhoo, now I'm all stocked up in cacao powder and nibs, vanilla beans, maca, agave syrup, and most importantly, coconut oil. Fun times lie ahead, that's for sure!

In fact, I'm in the middle of photo shooting my Layered Blueberry & Cream Cake which I'll be sharing with you tomorrow. Find layered cakes intimidating? I'll be walking you through the process, step by step, and you'll see that there's nothing to it. So stay tuned, it promises to be a swooning!

*~*~*~*
Photo Credits
Pizza Supreme by naomipoe
Crab Cakes by Anna of TheRawTable.com