I have released four recipe books so far:

The Best of the Sunny Raw Kitchen
The Best of Raw Freedom Community
Delightfully Raw and
Deliciously Raw

These feature some of the most delectable creations to have come out of my raw kitchen and will appeal to anyone interested in a healthier diet, regardless of their level of knowledge and experience. From easy one-step everyday fare to more elaborate and involved gourmet dishes and layered cakes, they offer something for everyone and every occasion. Incredibly tasty smoothies, creamy and comforting warm soups, sexy salads, delicious nut cheezes, satisfying entrees and scrumptious guilt-free desserts...

Healthy food never tasted so good!

To learn more about my recipe books, click here!

Monday, December 1, 2008

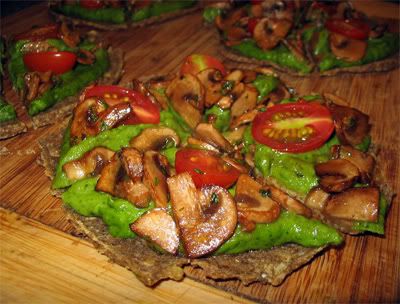
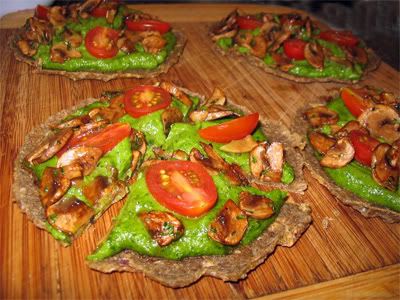
Recipes of the Week: Spinach Velvet Cream Pizzas

Last night's dinner consisted of not one, but three new particularly yummy recipes. This puts me in a tough spot; which recipe to share? But my friend Ingrid has made it easier for me, as today she's launching Raw Epicurean’s 1st Recipe Contest and the theme is leafy greens. Well, that settles it! I must at least mention, however, the lovely Creamy Sweet Pea Soup I whipped up, inspired by one Kelly posted on her blog. Super simple and totally delish!

Perhaps you remember the Spinach Velvet Cream Quiches I created a while back? I so enjoy the filling that I've served it countless times as a simple spread. I took things a step further yesterday by turning it into personal size pizzas. (Come to think of it, I have a bit of a theme going on about revamping quiche recipes! lol) They don't really require dehydration so were ready in no time, provided you have some ready made crusts lying around the freezer.


Spinach Velvet Cream Pizzas

Onion Bread Crust
Based on a recipe posted by Jaya Naga on Raw Food Talk

1-2 sweet onions
1-2 cups of sprouted buckwheat
2 cups ground flax
1 cup ground sunflower seeds
1/4 cup olive oil
1/4 cup Nama Shoyu
1/2 cup water. I process

Place onions in food processor with 's' blade and process until small pieces (but not mush).

Form into pizza crusts and dehydrate.


Spinach Velvet Cream Filling
1 avocado
2 cups spinach
1/4 cup fresh cilantro
1/4 cup fresh dill (or 1 tsp dried)
1 tbs olive oil
1/2 cup zucchini, roughly chopped
1 garlic cloves
2 tsp nutritional yeast
1/2 tsp onion powder
1/2 tsp sea salt or more if needed
Pinch of cayenne
Lemon juice, to taste

Blend all of the ingredients in food processor until smooth and consistent. Add water if too thick.


Toppings:
5 or 6 mushrooms, sliced, marinated in a little oil and tamari and dehydrated for 1 hour (opt)
Cherry tomatoes, sliced

Assembly:
Spread a generous layer of filling on Onion Bread Crusts.

Top the pizzas with marinated mushrooms and cherry tomatoes.

Enjoy immediately!

Mmmmmmm...

Didn't Mosaica do a fab job assembling the pizzas?


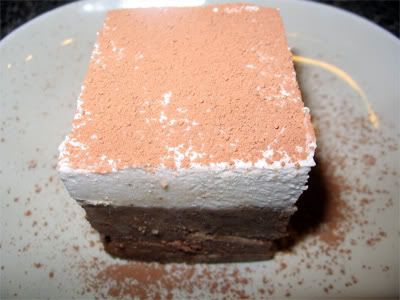
And I just couldn't finish this post without a few words about the dessert; it was insanely good! At last, I made Tiramisu from Cafe Gratitude's new book! It was also featured in their previous I Am Grateful.) The recipe needs a bit of tweaking (it pretty much collapsed as it thawed! Oops!), but I promise to share the result of my experiments as soon as I get a chance to play with it some more.

Looks mighty good though!


Now off to the airport to pick Heathy up for another Raw Diva adventure! Woo hoo!

Monday, November 24, 2008

Recipe of the Week: Spinach & Mushroom Pockets

Eventhough Thanksgiving has already come and gone for us Canucks, I certainly have lots to be especially grateful for; this past week was like early Christmas for me! Yay! (Guess I've been a very good girl!) I received 2 packages in the mail that made their way in absolute record time, given the fact I live in the boondocks. One was full of all sorts of goodies I'd ordered online that my good friend Joz forwarded to me. (Ahhh! The joys of living in Canada, eh? You'd be surprised how many outfits won't ship outside the US!) So now I'm loaded up in various raw items, including three new recipe books: Matthew Kenney's Everyday Raw (Can't wait to try the 'tofu'; totally ingenious!), The Complete Idiot's Guide to Eating Raw by Mark Reinfeld and Sweet Gratitude, devoted solely to Cafe Gratitude's magnificent desserts. (Good Lord! Un-be-lie-va-ble!) The other package contained Irish moss from Elaina Love; something I've been meaning to experiment with for ages! Hours of fun in the kitchen awaiting Heathy and I during her coming visit... Woo hoo! The 'to make' list is getting longer by the day! lol

In fact, it seems I've been doing more browsing for new recipes than actually preparing them. So much so that I was a bit at a loss as to what dish to feature this week. But that only lasted until I fetched out of the freezer the mini pockets Mosaica and I made during our last savory D day. The funny thing is that they came about totally unexpectedly. (Isn't it how some of the best recipes get created?) After assembling Russell James' excellent Spinach & Wild Mushroom Quiches, we ended up with lots of let-over filling. Hum, what to do? As we were also planning to make the Veggie Pizza Crusts, we swiftly changed plans and used the filling for mini pockets.

All I can say is "Wow!" I'm in love with pockets!!! So many possibilities to play with and so fun to eat! Bet they would make a fantastic take-along snack too. As I'm munching on them, I have to remind myself that these are raw! lol


Spinach & Mushroom Pockets

Makes 10-12 mini pockets

Herb Crust
4 cups sprouted buckwheat
4 cups chopped zucchini
1 cup ground golden flax seeds
3 cloves garlic
2 tbs olive oil
2 tsp onion powder
2 tsp tamari or salt (to taste)
2 tsp Herbes de Provence

Process in food processor until a dough-like consistency is reached.

Form batter into small half circles on Teflex sheets, between 1/8 and 1/4 " thick.

Dehydrate for a couple of hours at 110 degrees. Flip onto mesh, dehydrate some more until dry to the touch (another hour or so). You still want the dough to be pliable so as to pinch the edges together when assembling the pockets.


Spinach & Mushroom Filling
Adapted from a recipe by Russell James

2 cups crimini or button mushrooms
1/2 tsp salt
1 tbs lemon juice

Wash and roughly chop the mushrooms, then marinate them in the salt and lemon juice and set aside.

2 cups zucchini
1/4 cup water
1 1/2 cup cashews
1/4 cup white miso
2 tsp lemon juice
1/2 medium white onion
3 tbs nutritional yeast
1 tbs powdered psyllium husk
1/2 tsp salt

Blend all ingredients in a high-powered blender until smooth.

2 cups tightly-packed spinach
2 tbs olive oil
1/4 tsp salt

Pulse spinach, olive oil and salt in a food processor for 10 to 20 seconds until broken down.

Drain the mushrooms from earlier and transfer them to a large bowl, along with the blended courgette (zucchini) mixture, and spinach. Then also mix in the following ingredients:

1/4 cup finely sliced spring onions
1 cup diced tomatoes
1 tbs minced basil (or 1 tsp dried)

Once thoroughly mixed, pour this mixture into the bases. You'll need to slightly overfill the bases as the filling will reduce slightly in the dehydrator.

Dehydrate overnight and during the day, for anything up to 24 hours.

Remove from the dehydrator and decorate with slices of tomato and fresh basil sprigs. It's also a good idea to brush the top of the quiche with a small amount of olive oil, to make them more appealing in their appearance.

Assembly:

Spread a few tablespoons of filling on a half circle of crust.

Place other half on top and carefully pinch the edges together. (Dipping your fingers in water helps the process.)

Dehydrate the assembled pockets at 110 degrees for 8 hours or so. (I left mine overnight.)


Carmella's Notes:
~ In order to facilitate the pinching process, I usually spray a little water along the edges of each half-circle and let it sink in before getting to work.

~ You may have some filling leaking out as you pinch. That's okay; just wipe it away and make sure to close the sides well.

I served these bites of deliciousness with Creamy Lemon Herb “Noodles” posted on Julie's Raw Ambition blog and a mixed green salad with my house dressing.

Delish!

Monday, November 17, 2008

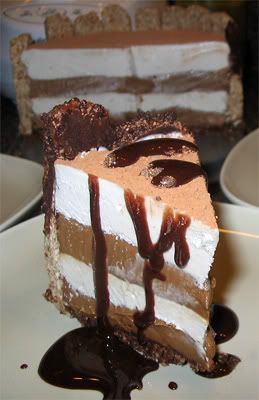
Recipe of the Week: Chocolate 'N Cream Charlotte


OK, of all the fancy desserts I've created so far, I must say this has to be the most elaborate. Actually, I've been toying with this dessert idea ever since the Coconut Lime Macaroons Heathy and I created last year. They turned out so light; I immediately thought of how they would make wonderful ladyfingers.

This Charlotte - a classic French dessert that usually consists of a ladyfinger 'mold', filled with fruit, mousse, custard or whipped cream - would definitely not fall under the 'quick 'n easy' category, mostly due to the fact that you must dehydrate the ladyfingers ahead of time. But don't let that stop you! The rest is pretty simple and the final result is so worth the effort! It would be perfect for the Holidays or for those times when you wish to make something special to impress the crowd!


Chocolate 'N Cream Charlotte

Serves 8

For this recipe, you'll need:
Ladyfingers
3 cups dry coconut pulp (from making milk with mature coconut)
1/3 cup agave nectar or raw honey
1/3 cup melted coconut oil
2 tbs lemon juice
2 tbs water
2 tbs vanilla extract
Pinch sea salt

Stir all ingredients together in a bowl until well mixed.

Form into ladyfingers (long and narrow) of roughly uniform size.

Place on Teflex sheet and dehydrate until firm and crunchy, flipping after a few hours.

Carmella's Notes:
~ If you don't have access to mature coconut, simply replace the coconut pulp with 1 part dried coconut, ground and 1 part almond pulp.

~ When forming the fingers, they will seem very fragile and as though the mixture isn't going to hold, but not to worry. Once dehydrated they will keep their shape.


Variation 1: For Chocolate Coated Ladyfingers
Dip ladyfingers in following mixture:

Dark Chocolate
1/2 cup melted coconut oil
1/2 cup cacao or carob powder (I used 3 part cacao/1 part carob)
1 tbs maple syrup
1 tbs agave nectar
1 tsp pure vanilla extract
1/2 tsp pure almond extract

Blend until smooth in high speed blender or food processor.

Set chocolate coated ladyfingers aside on parchment paper. Chill for a few minutes.


Variation 2: For Tiramisu-Style Ladyfingers
Dip ladyfingers in a strong concoction of coffee substitute, such as Bambu or Inca, mixed with a little honey or maple syrup. You want to soften them up while they still retain their shape.


Chocolate Brownie Crust
1/2 cup walnuts
1/2 cup pecans
1/4 cup pitted dates
1 tbs cacao powder
1 tbs carob powder
1 tsp vanilla extract

Place walnuts and pecans in a food processor and process until ground. Add dates, cacao, carob and vanilla extract. Process until crumbly.


Chocolate Mousse
I actually used Heathy's yummy Nutless Chocolate Mousse recipe from her new ebook (coming out very soon!) but any avocado-based mousse should do. This is the one from my Chocolate Mousse Cakes:

2 medium ripe avocados
1/2 cup almond milk
1/4 cup + 2 tbs water
1/4 cup cacao powder
1 tablespoon carob powder
1/2 cup raw honey or agave nectar
2 tablespoons maple syrup
1/2 whole vanilla bean (vanilla pwder)
Pinch of salt
2 tablespoons lecithin powder*
1/2 cup melted coconut oil

*Lecithin is derived from soybeans and acts as an emulsifier. Look for lecithin granules (preferably non-GMO) at your local HFS. Before using in recipes, make sure to grind them up in a high speed blender of coffee grinder.

Blend all ingredients except the last two in high speed blender until smooth. Add lecithin and coconut oil and blend some more.


Whipped Cream
1 cup cashews
1 cup + 2 tablespoons fresh coconut milk (simply blend 1 part dried coconut with 3 parts water in high speed blender)
3 tablespoons raw honey or agave nectar
1 tablespoon lemon juice
1 tablespoon vanilla extract
Pinch of salt
1/2 cup melted coconut oil
1 tablespoon lecithin powder*

Blend all ingredients except the last two in high speed blender until smooth. Add lecithin and coconut oil and blend some more until thoroughly mixed. Set in fridge for about 1 hr.

Carmella's Notes:
~ If you can't find lecithin granules, you can use 2 teaspoons psyllium husks instead. As a result, I found that I had to let the cream set in the freezer rather than the fridge. The consistency also made it difficult for the cake to hold its shape well once at room temperature. However, this may not be a major issue if you keep the cake in the freezer, thawing pieces as needed.

~ If the Whipped Cream is too set, place container in hot water, stirring until desired consistency is reached.


Assembly
1- First lightly press crust at the bottom of a 7" spring form pan.

2- Form little indentations along the edge and secure ladyfingers, one by one. I managed to fit a total of 18.

3- Once the ladyfingers are in place, pat the crust firmly against the bottom.


As you can see, I tried both plain and chocolate dipped ladyfingers.


4- Next, pour half of the Chocolate Mousse, followed by half of the Whipped Cream. Place in the freezer to set.


5- Once firm, repeat layers with the rest of the Chocolate mixture...


... finishing off with the Whipped Cream.


6- Set the whole thing in the fridge or freezer until completely firm.

7- Before serving, sprinkle with sifted cacao powder.

8- Slice Charlotte (I found that the easiest way was to make cuts at every 2 ladyfingers.)

9- Drizzle pieces with Chocolate Sauce. Again, I used a recipe from Heathy's new 'Just Desserts' ebook, but any Chocolate Sauce would do. You can make a simple sauce by mixing cacao powder with a bit of agave and vanilla.

Thick & Dreamy Chocolate Sauce
By Karen Knowler

Oh-My-God. That’s really just about all I can say.

Ingredients
• ½ cup raw chocolate powder
• ½ cup dark agave nectar
• ½ cup raw cashew butter
• 1 teaspoon of vanilla essence

Directions
Simply place all ingredients into your food processor (this works better than a blender) and process into a thick runny chocolaty goo! It’s a miracle! About 2 minutes worth of pouring and whizzing for the most amazing creation ever.

Enjoy and give thanks for how yummylicious raw food can be!