I have released four recipe books so far:

The Best of the Sunny Raw Kitchen
The Best of Raw Freedom Community
Delightfully Raw and
Deliciously Raw

These feature some of the most delectable creations to have come out of my raw kitchen and will appeal to anyone interested in a healthier diet, regardless of their level of knowledge and experience. From easy one-step everyday fare to more elaborate and involved gourmet dishes and layered cakes, they offer something for everyone and every occasion. Incredibly tasty smoothies, creamy and comforting warm soups, sexy salads, delicious nut cheezes, satisfying entrees and scrumptious guilt-free desserts...

Healthy food never tasted so good!

To learn more about my recipe books, click here!
Showing posts with label spreads. Show all posts

Wednesday, January 9, 2013

Delightfully Raw in Utah: Part II

The drive from Eagle Mountain to St-George was a breeze. It was pretty much just a straight shot down I-15 S. The forecast was predicting rain but it only started about 20 miles from our destination. No biggie.

Visiting Friends in St-George
It had also been two years since our last visit with Barbara and Duane, so we were glad to get a chance to spend a bit of time together. As you may recall, Barbara is the president of VSU, the Vegetarian Society of Utah, and has done SO much to spread the good word about the benefits of eating
healthily in her community. Barbara & Duane have been following a whole food plant based vegan no-oil diet for the last five years and are lovin' it! It has helped Barbara in overcoming several health issues, including obesity. Now at 68 years young she's like an energy bunny and her enthusiasm is contagious!

Just a short two months before we got there Barbara had back surgery done. Thanks to her surprisingly good health it couldn't have gone smoother (they were able to operate from the front). In fact, her doctor says he's never seen anyone recover so quickly from such a major surgery! ;-)

B&D really get into the Holiday spirit; they are notorious for putting up sometimes as many as 7 Christmas trees around their home! But this year, with Barbara's surgery and their new feline daughter Chai, they decided to stick mostly to lights and little festive decorations.


Raw Potluck
The day after our arrival VSU held a raw potluck at B&D's lovely home. They were a wonderful bunch and I had lots of fun demoing two of our staple recipes: my Strawberry Banana Shake and Sweet Pea Soup.


My little elves getting the samplers ready.


Once again VSU members really outdid themselves and got very creative with their dish contributions, even though raw is very new to many of them.


Kevin Kirkland, a gentleman who is just opening a smoothie bar in St-George called TruBerry, brought a couple of samples of his concoctions for us to try.


Tru Green Smoothie
Apple juice
Banana
Acai berries
Blueberries
Strawberries

Tru Berry Red
Apple juice
Banana
Acai berries
Blueberries
Strawberries
Raspberries


A beautiful salad with the colors of the season made from kiwi, pomegranate, cilantro, avocado, onions and peppers.

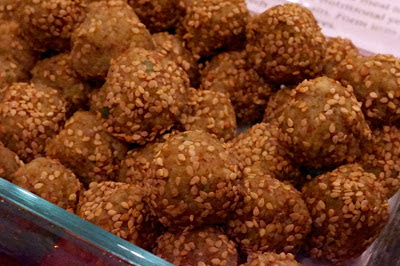
Golden Onion Morsels


Golden Onion Morsels
From Joel Fuhrman's Super Immunity

Makes 30-40 balls

1 1/2 cups raw cashews
1 cup raw almonds
1 med. Golden Delicious apple, peeled, cored and sliced
1 tbs nutritional yeast
1 tsp ground chia seeds
1 tbs onion powder
Toasted seame seeds - for coating
Minced chives - for coating

Grind cashews and almonds into a powder in high power blender.

Add apples, nutritional yeast, chia seeds, onion powder and blend again.

Form into small balls and roll each ball in sesame seeds and chives.


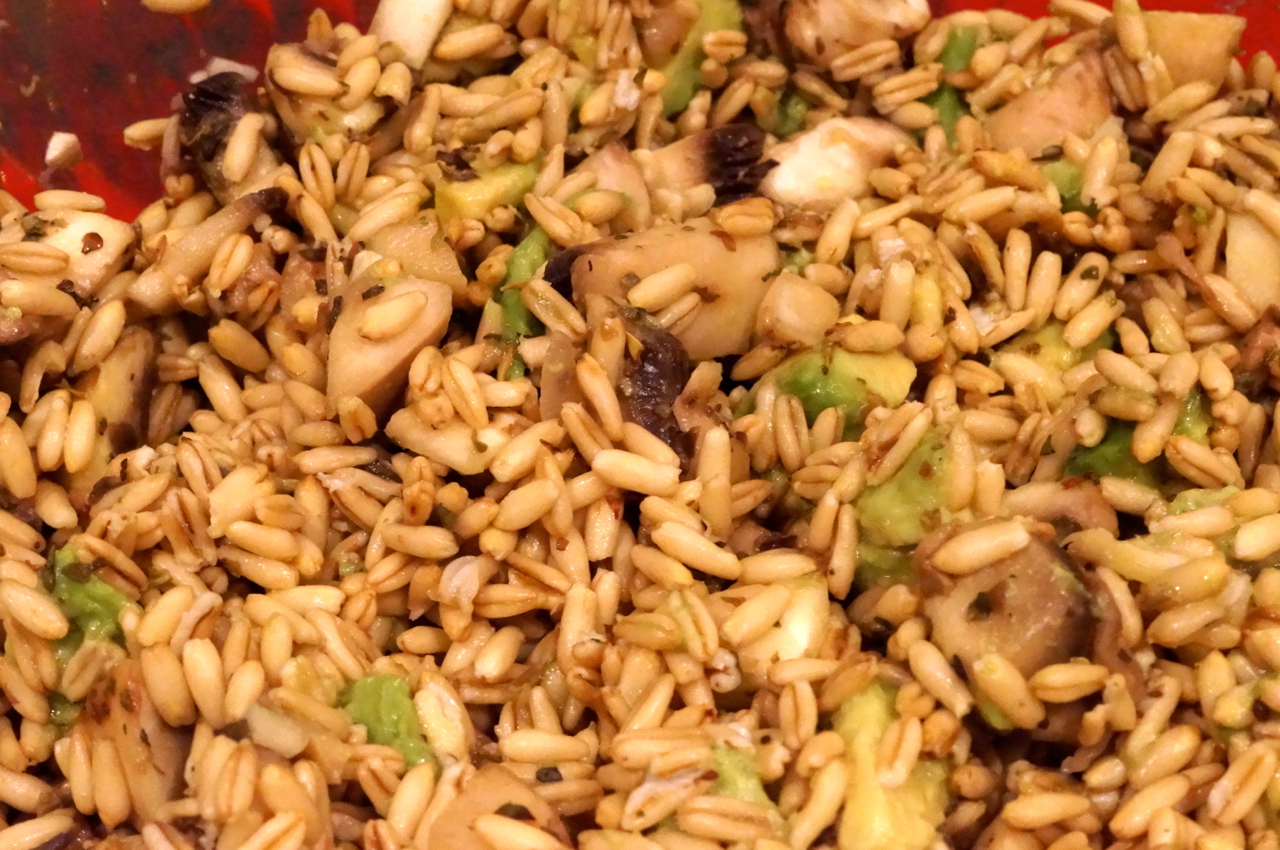
Savory Oat Rice
Posted by Jinjee on Gone Raw

We have finally found a way to make raw rice! The secret is not to use rice at all, but raw, soaked oat groats. You can buy the raw oat groats in bulk or in bagged packaging. They look just like brown rice. Soak them for 24 hours and follow the recipe! It is amazing how much this tastes like a rice dish, and satisfies just like rice too. However, the germinated oats give you a ton of energy, which of course cooked rice does not. The men in my family love this recipe, as it is high in protein!

1 c oat groats
1 c button mushrooms, diced
3 tbs olive oil
1 clove garlic, finely chopped
1/4 tsp sea salt
Savory herbs (thyme, marjoram, sage, or oregano, etc..)
1 Hass avocado

1. Soak oat groats for as little as 24 hours and up to 48 hours. The grains become softer the longer you soak them.

2. Marinate mushrooms for 24 hours in garlic and 2 tbs. olive oil

3. Drain oats, rinse, place in bowl, and add the marinated mushrooms

4. Add 1/4 tsp Celtic sea salt, 1 tsp olive oil and savory herbs

5. Let sit for 1 to 3 hours

6. Add 1 Hass avocado, cubed

7. Stir and serve


Guacamole and raw crackers


This was a yummy cheezey spread made with cashews, nutritional yeast, lemon juice, turmeric, red chili, miso, turmeric and green peas.


Another lovely salad: kale, cabbage, zucchini, tomato, bell pepper and pomegranate. It was served with a ranch type dressing made from cashews, garlic, lemon juice, dates, vinegar, onion, basil and salt.


Barbara had made Carrot Crackers and one of my variations from the wonderful vegan cheeze that she introduced me to during our last visit.


Carrot Crackers
Published in VegNews Magazine 12/11 issue

Makes about 35 crackers

1 cup raw sunflower seeds
2 1/2 cups grated carrots (approx. 10 organic carrots)
4 tablespoons flaxseed meal
1 teaspoon salt
Freshly ground black pepper to taste
1 tablespoon minced ginger
1/2 to 1 cup water

1.  In a food processor, grind sunflower seeds into a fine powder.  Add carrots, flaxseed meal, salt, pepper, and ginger.  Pulse a few times to combine.  With processor running, add water in a thin stream.  Stop processing when mixture is thick, but moist enough to spread.

2.  In a dehydrator on two parchment-lined dehydrator sheets, spread mixture until 1/4 inch thick.  With a knife or pizza cutter, score into cracker shapes.  Dehydrate at 115 degrees for about 6 hours.  Flip dry dough and dehydrate on the other side for another 4 hours.

3.  For a non-dehydrator option, preheat oven to 350 degrees.   On two parchment-lined baking sheets, spread dough 1/4 inch thick.  With a knife or pizza cutter, score into cracker shapes.  Bake for 40 minutes or until dry and crispy.


She also whipped up a batch of this awesome Tropical Chutney that she discovered when she attended the 40th IVU International Vegetarian Congress in San Francisco last October.


Tropical Chutney
By Shanta Nimbark Sacharoff
Recipe posted here

Makes 4-5 half-pint jars
 
You can use any combination of mangoes, papayas, pineapples, peaches and/or apricots along with sultanas (yellow raisins).
 
1 cup dried and chopped tropical fruits
1 cup warm or hot water
1 cup yellow raisins
2 tablespoon fresh, grated ginger root
Juice of one large lemon or lime
1/2 teaspoon cayenne
1 teaspoon salt
Additional water as needed

Place the dried fruit in the warm or hot water and set aside for ½ hour or longer to soften.

Then place all ingredients, including the water in which the fruit pieces are soaking, in the jar of a blender or a food processor. Puree the mixture, adding more water as needed to yield a fine-grained pudding-like consistency.

Allow the chutney to stand for a few minutes before transferring it to a serving bowl for storage, or to clean glass jars for gifts.

This chutney will keep for several weeks if refrigerated.


And on the sweet side...

There's an older gentleman named Frank who has been a member of VSU for years. At every potluck he proudly brings his very own creation: a raw pie made from almonds, dates, blackberries, raspberries and blueberries.


Chocolate Nut Balls made from walnuts, almonds, cranberries, raisins and cacao powder.


This was my personal favorite brought by a lovely lady named Hazna. It started off as a raw apple pie that she got from a lady named April Fazini. She then modified it by adding mango, pineapple and persimmon folded into a yummy cream made with cashews, almond milk creme sauce and sweet potato. Decadent! In fact I even had 2 servings! ;-)


There was also a delicious Chocolate Pudding but I didn't get a chance to take a pic as the dish arrived while I was doing the demo. BUT you can see it at the bottom right corner of Don's plate. It was made with coconut meat, agave, maple syrup, raw cacao powder, carob, vanilla and a pinch of salt. Gina served it with fresh raspberries. Yum!


Let's munch! Yay!


This was my serving. I'm such a foodie; I had a hard time not trying a little of every dish. As a result I momentarily forgot that it had been less than a week since I was eating solid foods again. I later had to pay the price, as my belly complained about this mistreatment. As good as it tasted this feast ended up sending me on a downward spiral in terms of digestion. In the end I had to go back to liquid foods to give my body a chance to recover. In fact, I'm still not totally back to normal yet. *sigh*


A few of us stayed quite late after the meal as we were all caught up in interesting conversations. 

Greg and Mark, two super nice men I had met at the last raw potluck that Barbara held here.


Donnie caught Pu and I the next morning while we slept in. ;-)


Before we left we had a little photo shoot with Barbara and Duane. ;-)


Barbara had the idea to get some family shots with Miss Puss.


I hope you too had a wonderful Holiday Season filled with joy, radiance and beautiful people!

Monday, November 26, 2012

How to Make Homemade Raw Almond Butter

Mmmmm... Almond butter! Such divinely yummy stuff!

Since we virtually never eat bread, we don't have many occasions to use it as a spread, but we do like it sometimes as a dessert treat on rice cakes with honey and a sprinkle of cinnamon. Almond butter can also come in super handy for making a last minute Almond Milk; just blend one tablespoon or so with some water, and there you have it! Oh, and let's not forget how it's an essential component for sauces like my Pad Thai or Satay dishes.

As you know, since commercially sold almonds now have to be pasteurized by law, we can no longer trust that almonds and other almond products on the shelves of our favorite health food stores are raw in spite of what the labels say. We can find 'truly raw' almond butter at specialty stores such as The Raw Food World, but it can be very pricey.

Of course, I've fantasized about making it myself before, but the only way I'd heard of was in a food processor; a technique that can take many minutes with several pauses to avoid the motor from overheating.

I was therefore thrilled when our host Matthew offered to show me how he makes his own in his Vitamix blender.

Matthew's Scrumptious Homemade Raw Almond Butter

Yields: one 16 oz jar

Step 1: Soak your almonds overnight. You'll want at least 4 cups so that there's sufficient volume for the blender to process them properly. (Your final quantity will roughly reduce by half.)

By the way, Matt shared with me his favorite source for organic raw almonds: Bremner Farms. The price drops down to $7/lb when you order 30 lbs - a fab deal! We had no trouble getting to that amount by asking some of Matt's friends if they wanted to join in.

Step 2: Rinse your soaked almonds under fresh water then dehydrate them until completely dry. This can take anywhere from 24 to 48 hrs depending on what temp you use and the atmospheric conditions. You can tell that the almonds are ready when there is no discoloration at the ends when you break them between your fingers, and when they're nice and crunchy.

Step 3: Place your dehydrated almonds in a quart glass Mason jar (or any other container sealed from moisture) in the freezer for several hours, preferably overnight.

Step 4: Now this is where the fun begins...

Transfer your frozen almonds to the container of your high-power blender and blend. Matt suggests to do it right away as the almonds will start pulling moisture out of the air if they're left at room temperature. You want the blender to be on maximum speed and will need the help of a tamper to ensure that there are no air pockets and that the blades can do their job of completely breaking down the almonds' fibers.


Here you can see how the almonds are beginning to release their oils.


You'll most likely have to stop at least once during the process in order to pry away any bits of dry almonds stuck to the sides of the container. A chopstick works well for that.


When you start the blender again you'll want to go at a lower speed so as to reintegrate those chunks. Bear in mind not to run it on low for too long, though, as it will overheat the machine. Switch it back to high speed as soon as the almond bits are incorporated.


After a couple of minutes or so of processing you'll want to start monitoring the temperature, as the mixture will start heating up. This is why it's an essential step to put the almonds in the freezer first so that they don't do so as quickly.


Matt has an infrared thermometer which he uses to determine the temp of his food. I can see how such a little tool can be soooo useful for all sorts of things: melting cacao butter and coconut oil, making soup, cheeze or coconut yogurt, dehydrating goodies... you name it! In fact we've ordered one from Amazon although it's a slightly different model.


Actually at this point we decided to pop the blender container into the freezer to allow the almond mixture to cool down a little. You don't want to leave the container longer than 15 - 20 mins or the butter will start sticking to the sides.

Then blend again, still on high, to really make sure that all of the nut pieces are completely broken down. If it won't mix on high due to too much air going in, you can bring the speed down using the control dial for a bit.


Stop when you've reached the texture that you're looking for. We like our butter nice and smooth...

Be-yu-ti-ful!


Step 5: Time to transfer your freshly homemade almond butter to a glass jar. It should keep for at least several months in the refrigerator (or the freezer), but I doubt that it will last that long! ;-)


Voila! The BEST raw almond butter EVER!


One final note: Matthew reminds me that it's not an exact science; it's for us to get a feel for the process and determine what works best.

I'm sure looking forward to perfecting my technique to whip up decadent homemade raw almond butter. Yay!

What about you? Have you ever tried making your own nut butter from scratch?

Wednesday, September 12, 2012

Raw in a Flash Video: Almonnaise


It's been quite a challenging week for us. For one thing the weather has really turned and we can feel the undeniable promise of winter coming. In our case this means we have to get ready to move, as we won't be able to stay comfortably in the trailer where we are for much longer than another 5 or 6 weeks. My fingers are actually so stiff from the cold that I'm having a hard time typing right now. Brrr! Anyhoo, as always, transitions are not an easy time. We still haven't got a clear sense of what The Mystery has in store for us next and are doing our best to try to decipher the omens.

Also my laptop is seriously sick. We suspect that the logic board or the video card is toast; a costly repair that is probably not worth getting done as the computer will be obsolete in another year or two anyway. It's a major expense we hadn't expected, especially unfortunate right now. In times such as these it can be hard to remember that all will work out for the best in the end. I just wish I could see with greater clarity what is the right course of action.

Anyhoo, difficulties or nay, thankfully I can still take refuge in my sunny raw kitchen and whip up something delicious to brighten up my mood. Today I'm sharing with you a video in which I demo how to make a raw vegan almond-based mayonnaise. We've been making a variation of this recipe for many years. It's sooooooooo creamy, versatile and best of all yummy! It makes a fantastic dip for veggies, condiment for sammies (try it on a piece of onion bread with a slice of tomato and some sprouts!) or even dressing (just thin it with a little water).


Almonnaise
From Carmella's Delightfully Raw

1/2 cup almonds, soaked overnight
1/2 cup water (put 2 ice cubes in the water)
1 1/2 tsp raw agave or honey
1 tsp nutritional yeast
1 tsp herbal seasoning of choice (I like unsalted Spike)
3/4 tsp salt
1/8 tsp yellow mustard powder
1/8 tsp black pepper
2 cloves garlic
---
1 cup cold pressed olive oil
3 tbs lemon juice
1/2 tsp apple cider vinegar

Process first nine ingredients in a high-speed blender such as the Omni V 3HP until smooth. It may take a while to break down all of the almonds but don't lose heart!

With the blender running on low, remove insert in top and drizzle in the oil in a thin stream.

Keep the blender running and add lemon juice and vinegar. Blend on low for a few more seconds to allow mixture to thicken.

For a plain Almonnaise, stop here.

For a Herbed Almonnaise, now add:
2 tsp dried basil
2 tsp dried tarragon
1 tsp dried dill
1 small green onion, minced

Blend briefly, only to incorporate.

Refrigerate in an airtight container. It will keep for about 10 days.

Carmella's Notes:
~ The purpose of the ice cubes is to help thicken the mixture. If the almonnaise seems runny after adding the oil, add in an ice cube or two to help thicken it up again. Bear in mind that it will also thicken once refrigerated.

~ If you don't have almonds already soaked, you can also use dry almonds. Just make sure to powder them up in a coffee grinder or in the blender first before adding the rest of the ingredients.

~ For a lighter almonnaise you can replace half of the olive oil with 1/2 cup Irish moss paste. To make Irish moss paste, blend 1/2 cup packed soaked Irish moss with 1 cup water until completely broken down.

~ Don't hesitate to make your own herb blend by using your favorite dried or fresh herbs!

Omni V 3 HP
You can learn more about the Omni 3HP blender on this page.

 You can visit Omni's website directly by clicking on the banner below.


*~*~*~*~*

Tuesday, August 28, 2012

Raw in a Flash Video: Basil Pesto

August is such a magical month here, especially when you have a garden. Regard- less of how long it might have taken for summer to arrive, by this time the weather is wonderfully sunny and warm. And of course everything is just bursting out and growing like crazy!

This is the first year that I've started my own garden pretty much from scratch, deciding what to plant and where. Before that I only got a chance to get involved later in the season once things were already in the ground.

This task proved to be both exciting and intimidating at the same time! I opted to start small and keep it simple, growing just a few no-brainer things. Among them were several basil plants. To me there is nothing quite like fresh tomatoes and basil to embody the summer's bounty.

Here's an awesome Pesto recipe that is easy, light, versatile and utterly delicious. I like to make it with both basil and spinach but you could use only basil if you prefer.


And now for the recipe...


Basil Pesto
4 cups fresh basil and spinach, packed (I like to use 1/2 of each but you could also use only basil)
2 large garlic cloves
1/4 cup walnuts, soaked for 4 hours
2 tablespoons olive oil
1 tablespoon nutritional yeast
2 teaspoons lemon juice
1/2 teaspoon salt

Place all the ingredients in a high-power blender and process until smooth. (You may need to use a tamper to keep things moving.)

Store in an airtight container in a fridge or in the freezer.

Enjoy on your favorite crackers with a nice juicy slice of tomato, on raw Pizza or Zucchini Noodles, or in a scrumptious Lasagna such as this one.

Saturday, June 11, 2011

Delightfully Raw on Vancouver Island: Part II

A few days ago I began to tell you about our time on Vancouver Island. Here are some more tidbits of our adventures there... 

Raw Potluck
Pat and other raw enthusiasts meet every single Wednesday night at Zen Zero in downtown Courtenay for a raw potluck. Now, that is no small feat! We, of course, joined them while we were there. The food was absolutely delicious and a good crowd turned up.

Pat had made a whole bunch of stuff! She brought her Banana Pudding, a great big bowl of Salsa, and delicious Banana Crackers with a simple Tahini Date Spread.

Pat's Banana Crackers
Start the crackers the day before. Prepare to soak seeds for 4 hours or perhaps overnight.

1/3 Cup each of Flax, Sunflower & Sesame seeds in 3 Cups of Water

Soak a minimum of 4 hours, perhaps overnight.

4-5 Ripe Bananas, broken into pieces
1/4 Cup Agave Syrup (optional)
Vanilla - if using a VitaMix, put in one whole bean, cut into pieces - or use 2 Tbsp vanilla flavouring or 1 Tbsp vanilla powder
1/2 tsp full spectrum Salt (optional)
1 Tbsp Lemon juice

Add to soaked seed mix, stir.

1/8-1/4 Cup Flax seeds
1/8-1/4 Cup Sesame seeds

Process well & add to seed mix, stir.

1/4 Cup Sunflower seeds (optional)

Process only until fairly chunky.

Add to mix, stir. Your mix should be not too runny, not too thick.

If too runny, add a bit more ground flax &/or sesame seeds. If too thick, add enough water to make spreadable batter.

Spread onto Teflex dehydrator sheets (do not score into crackers yet). Dehydrate at 125 degrees F. for approximately 4 hours, then reduce to 105 degrees & dehydrate for approximately 8 more hours (or overnight).

Turn each cracker mix onto a cutting board & cut - pizza cutter works well - into cracker shapes. Put each cracker back onto mesh dehydrator trays & dehydrate for a further 4 hours, depending on whether you want chewy or crispy. To test, remove a cracker & let sit in open air for a few minutes - decide if that is the hardness or chewiness you desire.

Store crackers in a tightly sealed container. Will keep well for about 2-3 weeks. If kept too long, they will lose flavour.

Tahini Date Spread
Begin preparations the day before you want the jam.

Simply soaked dates - agh, about 1 cup, processed with tahini, approximately 1/3 of a cup.

Pat told me they're also very delicious served with:

Cranberry Orange Jam
2 Cups dates, soaked (see below)
1 Cup cranberries (fresh or frozen; dried cranberries are boiled in sugar)
1 Whole orange, organic, with skin, cut into pieces

Soak dates in enough water to cover for several hours to overnight (if I am making ʻjamʼ for banana crackers, I put the dates to soak at the same time I put the flax, sesame & sunflower seeds to soak; at the same time I will put the frozen cranberries in container in fridge to thaw).

Drain the dates (I save the sweet date water in fridge & use to sweeten other things or save to soak dates in next time I make ʻjamʼ).

Add dates, cranberries & orange to a food processor & process until very smooth. Done! Yum!

Lastly, like us Pat loves durian and had also brought Durian Pudding.


My Blueberry Pie was such a success at the dinner some nights before that I decided to make it again for the potluck.


Marussia, one of the owners of Zen Zero, had brought kelp noodles in a peanut style sauce. It turns out that she has been following my blog for years so it was nice to finally meet.


Zucchini noodles in a balsamic marinade topped with black olives.


During our travels I've come upon a recipe book published by another woman from BC called Rose. She actually lives in the area and was able to make it to the potluck. Yay! She is such a kind and gentle lady! It was also neat to meet another raw author; as you can imagine we had lots to talk about!

Showing each other's culinary babies. ;-)


Rose contributed a really yummy Egg Salad from her book, Uncooking With RawRose – Your Guide to Raw Foods, which she graciously accepted to share with you, my readers. Enjoy!

Not Egg Salad
From “Uncooking With RawRose – Your Guide to Raw Foods” by Rose Vasile

Quantity:  3 1/2 cups + 4 cups greens or sprouts to serve it on

Ingredients:
- 1 cup cashews
- 1/2 cup water
- 2 teaspoons dried oregano
- 1 1/4 teaspoons sea salt
- 1/2 teaspoon turmeric
- 1/2 teaspoon mustard powder
- dash of cayenne
- 1 tablespoon apple cider vinegar
- 1 date
- 1 medium zucchini (grated, then chopped a bit = 2 cups)
- 2 cups green cabbage (finely grated)
- 1 stalk celery (finely diced = 1/2 cup)
- 3 tablespoons fresh parsley (to mince)
- 1 green onion (finely chopped)
- 4 cups leafy greens and/or sprouts (optional)

⇒    Put cashews, water, oregano, salt, turmeric, mustard, cayenne, vinegar and date in a blender, but don’t blend yet (so cashews can soften slightly while preparing the other ingredients).

⇒    Put zucchini, cabbage, celery, parsley and green onion in a bowl. 

⇒    Blend ingredients that have been soaking in blender, until smooth, then pour over the zucchini, etc.  Combine well.  

⇒    Nice served on leafy greens and/or sprouts because the greens/sprouts get coated with excess sauce (besides tasting good and adding nutrients).

After the meal I gave a talk highlighting our approach to successfully transitioning to and maintaining the raw diet, which I outline in detail in my Delightfully Raw book. One of our messages is to look at it from the perspective of adding more raw foods into your diet rather that trying to stop eating cooked. As you include some raw recipes on your menu then there naturally will be less and less room for the cooked stuff.

Spreading The Raw Buzz
We'd planned to give a food prep workshop a couple of days later and debated whether we should cancel it as there were so few participants. In the end we decided to go ahead anyways and I'm so glad we did; it turned out to be a fun and informal affair.

On the menu was Green Cucumber Soup, Spinach & Cream Pasta Casserole, Tuna Salad, Blueberry variation of my Strawberry Shortcake and my Fruit & Nut Chocolate Candy.

  Spinach & Cream Pasta Casserole before the Pine Nut Parmesan and going in the D.


And after about 1 hour at 110 degrees.


 Ready to munch!

At Stephen's Gardens
The day before we left Comox Pat took us to see her friend Stephen Cochrane's gardens. Stephen is the director of Raw BC Society - an organization whose mission is to promote the health benefits of an unprocessed raw food diet and to connect the resources of existing raw food advocating communities around British Columbia. Stephen has been eating raw for the last 20 years and dedicates a great deal of his energy to gardening and self-sustainability. He is also very involved with the Comox Valley Growers and Seed Savers. Stephen took some time from his busy schedule in order to give us a little tour of his family's property, share some gardening tips and exchange ideas. To my delight, he gave us several types of seeds for our own future gardening ventures. Yay!

A hothouse ingeniously rigged with a wood stove with an extra long pipe to prevent plants from freezing during the winter months.


Glorious pink rhododendrons


After spending a little over a week in the Comox Valley it was time to get back on the road. Pat came over to see us off and took this photo as we were getting ready to roll.


Rathtrevor Beach Provincial Park
Before leaving the island we decided to spend a couple of days at Rathtrevor Beach Provincial Park, just south of Parksville and about half an hour north of Nanaimo. After being in a town environment for a while we figured we could use some time in Nature, plus it would lighten up our journey back to the mainland.

The park is huge, covering some 347 hectares and the campground has over 175 sites. While it doesn't have hook ups there's access to water and several outhouses around the facility. There's also a couple of shower buildings which felt like such a luxury after all the rough camping we've been doing of late. Being on a weekday and out of season the place was virtually empty and we found a great quiet spot.


The park offers 5.5 km of trails through forests and along the ocean so we got to walk to our feet's content.


Back to the Mainland
The next morning we woke up early and got on the 10:40 ferry from Nanaimo to northwest Vancouver. In spite of the predicted rain the weather held off throughout the ride, offering a beautiful view of the gulf islands.


Once on the mainland we were soon met with intermittent showers. The drive was uneventful and since with the rain and all there wasn't much to see, it gave me a chance to catch up on my blogging.


We had planned to stop for the night a few miles passed Princeton but we were getting concerned that we might have to keep going as the rain was falling pretty fiercely; definitely not good camping weather. Thankfully by the time we made it to Stemwinder Provincial Park the sky had cleared up. Phfew!

 The campground is right by highway 3 but we found a site along the Similkameen River which was running so strongly that we could barely hear the nearby traffic.

There she is in the last rays of sunshine.


The boys chilling out after the long day's drive. Notice Puss next to the coolers?


She was just then getting ready to explore our surroundings in earnest.


The Last Leg of Our Journey
We repacked the van the following morning and continued our travels towards the interior. To my great delight the further we went the more the sky cleared up, offering a stunning spectacle of the most amazing cloud formations. The province is referred to as 'Beautiful British Columbia' and that it truly is. It had been a while since we'd traveled this road and thoroughly enjoyed it.


We drove through the Okanagan, the area that supplies the bulk of the fruit that is grown in Canada. We encountered many fields, orchards and vineyards, testifying to the abundance of the region.


Shortly before we reached Osoyoos we passed by Spotted Lake. I learned some fascinating stuff about this unique phenomenon on Wikipedia. The "lake is very highly concentrated with numerous different minerals. It contains some of the highest quantities (in the world) of magnesium sulfate, calcium and sodium sulphates. It also contains extremely high concentrations of 8 other minerals as well as some small doses of four others such as silver and titanium."

"Most of the water in the lake evaporates over the summer, leaving behind all the minerals. Large “spots” on the lake appear and depending on the mineral composition at the time, the spots will be different colors. The spots are made mainly of magnesium sulfate, which crystallizes in the summer. In the summer only the minerals in the lake remain, and they harden to form natural “walkways” around and between the spots."


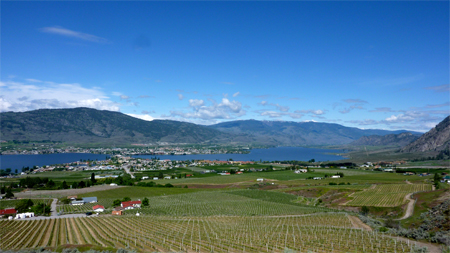
A view of Osoyoos Lake which is located in the heart of town.


As highway 3 leaves Osoyoos towards the east it quickly climbs steeply up with a number of hairpin turns, offering a stunning overview of the town and its surroundings.


More beautiful cloud formations as we continued eastward.


The Poo Saga
When doing research about border crossing I learned that while Miss daPuss (aka Puss, Miss daPu or just Pu for short) didn't need papers to cross into the US, Canada does require her to have a rabbies shot. As a general rule we like to stay way clear of hospitals and conventional medicine, but it seemed like we didn't have much choice. We found an animal hospital in Anacortes that had raving reviews online and the fee was ridiculously cheap so we took her in one afternoon. The lady vet was super friendly and even looked her over without any additional charge. Yay! She confirmed that our furry friend was in perfect health and was surprised to learn that Puss had been on the road for several months and showed no sign of stress or anxiety. (I mean, beside not being too happy to be at the doctor's! lol Who wouldn't, eh?)

So far so good, right? It wasn't long before it became clear, however, that we had unwittingly initiated a veritable poo/Pu drama...

The next evening Don pointed out that she had pooped three times during the day - an unusual occurrence for sure - but neither of us thought anything of it at first. I also noticed that she was drinking a lot more water than usual. But what really set off the alarm was when I heard Pu cry in pain and later discovered that her stools were unformed and contained mucus and blood. Eeek! She was otherwise looking fine so I only really delved into the matter once back in Canada.

While researching online I discovered that others had noticed similar side effects in their cats after vaccination. In fact in a few cases it had turned into an horror story; their beloved furries becoming unexplainably sick and even some dying within a short time! One woman took her dead kitten to the vet to be autopsied and the cause was determined to be panleukopenia; a feline type of leukemia. Somehow the rabbies vaccine had infected the cat with this extremely rare but very serious condition that attacks the pet's white blood cells. I read that with a deficiency of those defensive blood cells and an ulcerated intestinal lining, diarrhea, intestinal bleeding, dehydration and susceptibility to bacterial infections are the end results. Puss seemed to be suffering from some of these symptoms so I became increasingly concerned and braced myself for the worst.

While Kylo is very close to Don, Miss DaPu is my special companion. We are super bonded energetically and she usually ends up on my lap or curled up against me at night. She has been doing so marvelously well during this trip and has been getting sweeter and closer to me than ever. If it turned out that I had in effect unknowingly signed her death warrant! ;-(

I immediately contacted the vet in Anacortes to explain the situation and he said that he'd never seen such a reaction in his 40 some years of practice. He would have gladly had a look at her but that wasn't an option since we had already left the country. And so we booked an appointment at a local animal hospital for the following morning. According to my internet findings the prognosis wasn't encouraging as very little could be done to neutralize the panleukopenia virus other than to have the animal hospitalized in an attempt to fight off the dehydration stage of the sickness. In other words: mega bucks which we weren't sure we could afford.

The next morning, though, Puss had stopped drinking excessively and her condition didn't look like it had worsened, so we thought best to hold off on seeing the vet. Instead we decided to monitor her as closely as we could and take her in if other symptoms appeared. Over the following days she continued to have lots of energy and seemed otherwise back to normal. I was keeping my fingers crossed that she was on the other side of whatever it was that she had. Since we were camping and she spent a lot of time exploring our surroundings, it took a whole week before she finally pooped in her litter box again. Upon examination her stools didn't show any sign of her bowels being irritated so I thought we were out of the woods...  until I found more loose stools and a small amount of blood a few days later. ;-(

By that time it had been 3 weeks since the infamous shot, and I thought that panleukopenia could be safely ruled out as it usually manifests very quickly. Yet more research revealed that she might be suffering from irritated bowels as an allergic reaction to the nasty chemicals her body had been invaded with. That sounded right to me. At best it was just a minor condition that can be easily treated by giving the digestive tract a little rest. At worst it could have been that she had Irritable Bowel Syndrome (IBS) which would mean changing and closely monitoring her diet for the rest of her life. In any case from what I read I felt that a short 24 hour fast followed by a few days of a bland diet was a good place to start.

Feasting on durian
Being the food lover that she is, Puss of course loudly protested during the fast, pestering us through the night, but we firmly held our ground. While she is normally quite fussy about what she eats she adjusted surprisingly well to her new fare consisting of white rice, boiled chicken and pureed butternut squash (to help absorb extra moisture in her gut and solidify her stools). I also blended in a slippery elm mixture (1 tbs slippery elm powder whisked with 12 oz hot water) - an old herbal remedy for digestive issues that coats and soothes the intestines.

On the fourth day I began to introduce 'regular' food again (more about that later). I was anxiously awaiting her bowel movements to see how her body was responding to the fast and change of diet. Every time I checked her litter box, however, I saw that she hadn't pooped yet. As the days went by I became more and more concerned. Ironically she had gone from having diarrhea to constipation! Don's approach was to wait it off and let her body heal itself. I thought I'd do what I could to assist the process and tried a number of holistic remedies: adding more fiber (chia seeds and squash), olive oil and yet more slippery elm. But after 5 days of that and without result I called a vet.

He assured me that there was no cause for alarm just yet as she was still eating and keeping the food in. Things would take a different turn once she would start vomiting it back, an indicator that her colons were completely full. As a last resort I had thought of giving her feline laxative and he confirmed that it was a good idea. Thankfully, Pu actually really loved the stuff which made matters a great deal simpler than having to sneak it in her food or force her to lick it off herself.

In the meantime it also occurred to me that Pu had been cooped up in the van for over a week, as Arabella's house is located on a busy road which made it a little tricky to let her out. I felt that some exercise would no doubt do her a world of good and perhaps help to get her intestines going. On the down side it meant that I wouldn't be able to monitor her bowel movements. Still, I thought it was worth the chance so I took her in my arms and relocated her in the back yard, which she happily explored for a few hours. When we left Comox the following afternoon we also let her wander around our site for the two days that we spent at Rathtrevor Beach.

I stopped giving Puss the laxative after 3 days; if she wasn't pooping within the next 24 to 48 hours we'd have to go to the vet in order for her to get enemas; a procedure she would hardly enjoy. We were leaving the island and started the trip towards the interior. As usually happens when we're on the move, Puss spent several hours in her pet taxi - she feels safer that way than if we'd let her roam around freely. Once we reached our destination I suggested to Don that we keep her inside the van until the next morning to assess the situation. To my HUGE relief, a half hour or so after our arrival the deed had finally been done! Woo hoo! Her stool was also back to normal which was more fantastic news. It's not uncommon that bowel movements are associated with relief, but man, I can assure you that this one sure brought joy; I was literally jumping up and down and dancing around our site! ;-) "Pu finally lived up to her name," Don remarked. hehe

Puss Goes Raw
Over the past several years Puss' diet has consisted mainly of dry kibbles. The only bit of raw that she's been getting is an egg yolk when she's in the mood - like I said she tends to be a fussy eater. Don and I decided to take this opportunity to switch her to a mostly raw meat diet which is what cats are really designed to eat anyways.

Not up to handling raw flesh (ewww!) we went instead with Prowl, a dehydrated human-grade whole foods preparation that we found at a specialty pet store. I started off by mixing it with a high quality grain-free canned food, crossing my fingers that she would like it. She was a little hesitant at first but remarkably soon chowed the whole thing down. Yay! A few days ago I've switched her to fully raw, giving her Prowl along with a mixture made by Pets Go Raw (comes frozen).

Pu also took to our new routine of my feeding her every 5 or 6 hours instead of her having access to food whenever she wants. The only downside is that she's been waking me up in the wee hours of the morning demanding her breakfast. lol  This new approach should take care of the emotional eating that we'd notice her doing from time to time. And who knows, perhaps she'll even shed a few pounds which she could definitely afford!

While the whole vaccine incident was a good reminder that Puss isn't immortal and that one day she will leave us, I am grateful that that time hasn't come just yet. On the positive side it has turned out to be an indirect trigger to improving the quality of the food that we feed her, which she is bound to reap health benefits from.

That's it, folks! This post concludes this latest phase of our adventures on the road. We don't have any major projects lying ahead of us, so we're hoping to be able to take it easy for the coming summer months. I yearn to languorously relax in the sun, play in the garden and being creative in the kitchen again! Yippee! Naturally, I'll be keeping you posted on my latest culinary experiments. ;-)