I have released four recipe books so far:

The Best of the Sunny Raw Kitchen
The Best of Raw Freedom Community
Delightfully Raw and
Deliciously Raw

These feature some of the most delectable creations to have come out of my raw kitchen and will appeal to anyone interested in a healthier diet, regardless of their level of knowledge and experience. From easy one-step everyday fare to more elaborate and involved gourmet dishes and layered cakes, they offer something for everyone and every occasion. Incredibly tasty smoothies, creamy and comforting warm soups, sexy salads, delicious nut cheezes, satisfying entrees and scrumptious guilt-free desserts...

Healthy food never tasted so good!

To learn more about my recipe books, click here!

Saturday, April 28, 2007

A Simple Sprouting Secret

Well, gardening is definitely in the air, isn't it! When we went to town earlier this week for our bi-monthly shopping, virtually every store we went to was displaying gardening supplies of one kind or another: tools, gloves, soil, seeds, plants, you name it!

While everybody else is getting their hands and knees dirty, sadly we won't be joining in the fun. The land on which we live is surrounded by tall trees so 'no can do' for an outdoor garden. (Sigh) Actually, right now I'm kinda glad I don't have to take on gardening; not sure where I'd manage to fit that into my busy schedule these days, what with our new major project in the works and all.

I may not be blessed with the greenest of thumbs and a sunny garden spot, but I've been keeping a little kitchen garden of my own for years, regardless of the season.

Kitchen Harvest
I discovered sprouting early on when I became vegetarian. Although I did dabble a little into home-grown beans, sunflower and buckwheat sprouts, my specialty has always been small 'leafy' varieties, such as alfalfa or clover. The very first vegetarian book I bought was written by a well-known figure on the Quebec veggie scene; Renee Frappier. Amongst the many things I learned from her is a very simple sprouting trick I've been using successfully for years. I haven't seen it mentioned anywhere else, so I thought I'd pass it along to you guys. (Here I am, giving away all my secrets again! lol)

4 Steps To Successful Sprouting
Don't know whether you've ever tried your hand at sprouting, but not to take any chances, I'll walk you through the process I use. (Those of you who are experienced sprouters will recognize it as the 'Jar Method' with an added twist.)

What You Need
So first, let's have a look at what equipment you'll need to have on hand:
  • A wide-mouth glass jar (canning jars work great!) For my part, I use a big gallon jar, as I prefer to make a huge batch and be set for a while rather than have a constant ongoing sprouting operation.
  • Some kind of screen type lid to cover the jar. You can easily make one by cutting a piece of cotton cheesecloth or some kind of mesh, held in place with an elastic band. Most health food stores also sell plastic screen lids especially designed for sprouting that will fit on top of the wide-mouth jars.
  • A large plastic bowl
  • A cup, fork, and spoon
  • 1 or 2 round or rectangular plastic trays such as those used for germinating seeds
  • 1 or 2 pieces of plastic to cover the trays
  • A spray bottle
  • Oh, and I almost forgot! A few tbs. of sprouting seeds such as alfalfa, clover, radish, or sprouting mix packages you can find in HFS

Alright, now that we've got our equipment, let's get a-sprouting!

Step 1 - Soaking
The first thing you want to do is soak your seeds in fresh water for 8 to 12 hours to rehydrate them and initiate the sprouting process. (I usually put them to soak before going to bed and leave them overnight.) The amount of seeds you use depends on what yield you're looking for and the size of your jar. I use 4 tbs of seeds to fill up a gallon jar so I guess you'd need roughly 1 tbs per quart jar.

Step 2 - Rinsing
Once the soaking period is over, drain the soak water well, then give the seeds a good rinse. (I usually swirl the jar around for a few seconds.) It is key that you thoroughly drain the water, as it may otherwise cause your sprouts to rot. (Yuck!) For that purpose, tip the jar over at a 45 degree angle for at least a few minutes (a dish drying rack works well for this or you can just use your sink). Once the water is fully drained, leave the jar in a standing position on an out-of-the-way corner of your counter.

Some sources say that it doesn't matter whether you leave the sprouts exposed to light or not. Personally, I've found that my sprouts do better if I recreate a 'natural environment', so I start them out in the dark, by covering the jar with a towel.

Continue to rinse your sprouts with fresh water twice a day, for 3 to 5 days, being careful to drain them well to avoid spoilage. Length of sprouting time varies depending on how warm you keep your kitchen. (I've found that they generally do better in the cool.)

When the sprouts are a little over an inch long, take the towel off and continue the rinsing process for an extra day.

OK, this is all pretty basic, mainstream stuff so far. But here's where it gets interesting and differs from most sprouting techniques...

Step 3 - The Bath
Sometime by the 4th to 6 th day, your sprouts should be about one and 1/2 inch long and your jar nearly full:
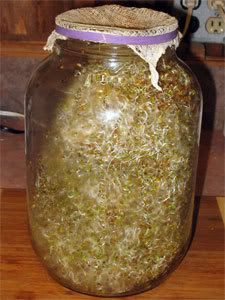

Time to give these little guys a bath!

Fill up a large plastic bowl with fresh water. Take the lid off the jar and transfer the sprouts over to the water by gently loosening them up with a fork. (If you're doing a large quantity, you may need to do this in 2 or 3 batches.)
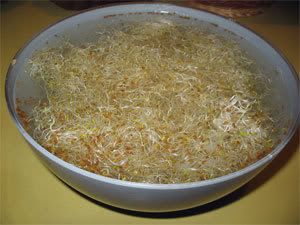
Then carefully separate the sprouts with the fork, since they've all gotten entangled in the sprouting process, and stir them around in the water. This will cause the hulls to loosen up and come to the surface. With a spoon, bring these over to one side of the bowl (see photo below) and scoop them out into a cup. This step is important, as it will make your sprouts more easily digestible. Plus, your sprouts look so much more appetizing without a bunch of little brown hulls.
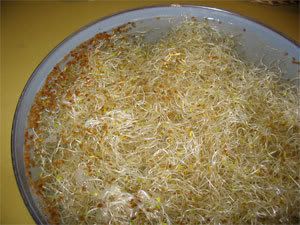

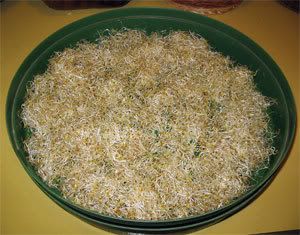
Once that's done, transfer the sprouts over to a large tray with the fork. I use a couple of big plant trays inserted in one another. If you look closely at the next picture, you'll see that Don has pierced a few holes in the top tray to allow for drainage.
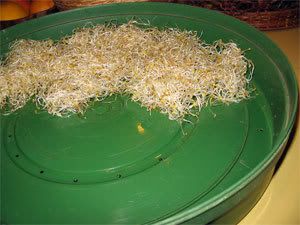

Alternatively, you could use rectangular gardening trays that are being sold for starting seeds from scratch. Once the tray is full, tip it over a little to one side so as to help drain some of the excess water.

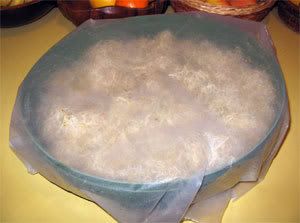
Lastly, cover the trays with a piece of plastic (germination trays come with a clear plastic top which is perfect for this), making sure it's airtight. You don't want the sprouts to be exposed to air, as it will cause them to dry out.

Step 4 - Greening
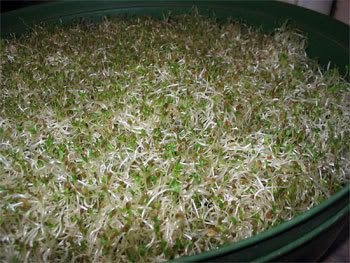
Leave your freshly bathed sprouts close to a window, but not in direct sunlight, to allow chlorophyll to develop. When they're all nice and green (which can take one or two days), the sprouts are ready for harvesting. (If it takes more than one day, you might want to check on them to make sure they're not dry. In which case, just spray them with a little water.)

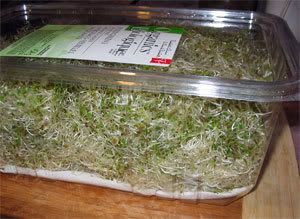
Finally, store your crispy fresh kitchen harvest into a sealed container or plastic bag. I like to use those 'Spring Mixed Greens' containers with some paper towel which I lay on the bottom to absorb excess moisture. I get to fill one and a half of those with the yield of one gallon jar, and we're stocked up in sprouts for a couple of weeks.

That's it! You're all done!

I know this may seem like a lot of work, but really it isn't. The whole bathing process only takes me 10 minutes or so and, believe me, is well worth the extra effort. Once you get to enjoy your very own beautiful home-grown sprouts, you'll no longer be able to settle for the store-bought variety!

As for the total sprouting period, I find that it can take from 6 to 8 days, depending on the season and how warm it is in our home.

Want To Know More?
For additional information as to the health benefits of sprouts and how to sprout other kinds of seeds/beans, you may want to have a look at the following sources:

Karen Knowler has also published an excellent article on the 'how to' of sprouting in a recent newsletter. It's still not available on her site yet, but fellow blogger, Raw Vegan Mama has posted it on her 'Journey to Raw'.

Happy year-round indoor gardening!

*~*~*~*
Photo Credits:
gardening tools by mysparetimedesign

Technorati Tags: , , , , ,

Saturday, April 21, 2007

Beyond Blogging

While searching through Blogger's Help pages the other day, I came upon some general guidelines about blogging. Amongst other things, they were recommending to keep posts short and to the point. Oopsie!

Outside The Box
Internet newbie that I am, when I created The Sunny Raw Kitchen, I had no real idea what blogging was 'supposed' to be like. In fact, I had only (and very briefly) visited a couple of other blogs. So I ended up doing what I know best how to: I 'sat back', so to speak, and let it rip; allowing for things to unfold. In retrospect, I'm really glad I did. I can't imagine keeping a lid on my creative bouts!

And so, The Sunny Raw Kitchen has evolved into a strange cross between a journal, a chronicle, a newsletter, a visual 'how to' gallery and a recipe collection, interjected with the occasional commentary on Life as perceived by yours truly, and lots and lots of mouth-watering photos.

Unexpected
Well, whatever this blog has developed into, it looks like it's working. The response has been way beyond anything I could have ever imagined! A little over 3 months after its launch, TSRK has something like 120 regular subscribers and hundreds of visitors dropping by every week. Wow! I remember telling Don that if what I had to share assisted a single person on their raw journey, it would be well worth all the energy I pour into it.

If you'd have told me 2 years ago, when we still didn't have a phone of our own, that we'd one day be interacting with thousands of people from all over the world, I would have laughed in disbelief. This is not to say that I get surprised easily by Life. (Don and I call it "The Ultimate Roller Coaster Ride"! lol) Still, in more ways than one, I'm in shock at the unexpected directions that this blog has taken.

What Next?
With the warm weather setting in and a new major project in the works, I can feel that a change in format is being demanded, but it's all good. Certainly the posts will be shorter and less involved. This will allow all of us to spend more time outdoors, enjoying the many blessings of the season, rather than staring at a computer screen.

Regardless of how this blog continues to evolve, my intention remains the same: to provide my readers with quality information, recipes and tips to help you on your journey to Raw and a healthier lifestyle. Oh, and have fun in the process too!

One thing is for sure; there is no shortage of ideas for exciting future posts. In the coming weeks, you can expect to learn about sauerkraut making, my special sprouting technique, and suggestions as to how to best equip your raw kitchen. In the works are also a post about Asian food in the Raw, as well as the 'Simply Raw' Series in which I'll be sharing lots of awesome recipes that can be prepared in a flash. Perfect for summertime!

My heart-felt thanks to you, my readers, who keep coming back, week after week, to find out about my latest 'rawdventures'. Without you, The Sunny Raw Kitchen would be a very lonely place. (Plus, this is soooooooo much more interesting than to be talking in my head to myself by myself! lol)

Blessings,

Carmella

Technorati Tags: ,

Monday, April 16, 2007

Maha'raw'dja's Feast

On a personal note, I've been feeling tired and somewhat 'out of it' lately. Not sure as to exactly why. Perhaps too many balls in the air all at once. I've heard of others going through something similar, so maybe it's to do with the collective unconscious. Who knows? But more to the point, what does it matter? This is what's happening and my challenge is to embrace it fully and without judgment.

No Man's Land
In the middle of the night I remembered Karen Knowler's article which I shared with you last week, and it suddenly hit me! With some upcoming major changes in our lives, this is totally a transitional time for me right now, and transitions are hardly ever easy or comfortable. You know, 'dark-before-dawn'-and-all-that kinda hard. Internally, it's as though I'm sort of in between gears, not quite ready yet to make the shift to the next level. My own personal 'no man's land'.

Drought
I can also feel how this phase has been taking its toll on my creativity. Hard to be creative when you can hardly muster the energy to go about your day. All I can say is 'Thank God for freezers!' Days like these sure make me appreciate being able to dig out pizza crusts or burgers from our frozen stash of raw goodies, and come up with a quick, no-brainer meal. Raw Fast Food.

In spite of all this, on the weekend, I somehow managed to create a rawsome Indian feast. I've actually been wanting to post a raw Indian menu for a while, but somehow, the time hasn't felt right until now.

I Heart Indian Food
I first fell in love with Indian food during my 'roam around the world days', while working at an Indian restaurant in England. During my breaks as a waitress, I'd go hang out in the kitchen and watch in amazement as the cook would expertly dip the tip of his huge spoon into different spice containers (forget about measuring!) and throw it all into the pan. Culinary alchemy! Needless to say I got to eat my fare share of his delicious concoctions and became hopelessly hooked.

I was more than stoked to realize that I could still enjoy fabulous Indian-style dishes, minus the not-so-fab side effects. I'm here to share the good news: Indian food lovers rejoice and behold our amazingly delish Maha'raw'dja's Feast...

First Things First
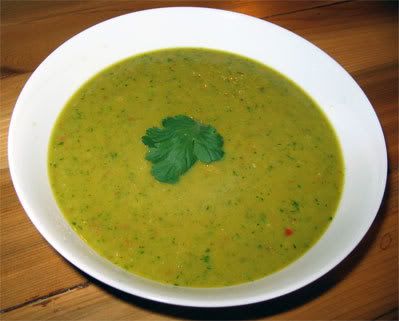
We began our festive Indian meal with a delicate curry soup I created on the spot. Don got a head start while I was busy taking pics. "Oh, man," he says to me, "you've got a recipe, babe!" He declared (and I quote) that it's "delicious, spicy but not too much, all of the different tastes balanced to perfection, with just a hint of sweetness. One of the best soups you've made!"

Well, in case you think he's bias or something (now why would you think that?), give it a try and let me know what you think!


Carmella's Curry Soup
1/2 avocado
3 " piece cucumber
2 " piece zucchini
1/4 cup red or yellow pepper
1 celery stalk
1 green onion
1 garlic clove
Handful dill (or 1 tsp dried)
Handful cilantro
A little lemon juice
3 apricots soaked in a little water
1/2-3/4 tsp curry, or to taste
Dash cayenne
Salt, to taste
2 cups water (or more)
Apricot soak water

Blend until smooth.

Carmella's Notes: I just made it again for supper to check on my measurements and a couple of things popped to mind. Unless you have a high-speed blender, make sure the apricots are really soft so that they dissolve fully when blended. I also used more like 1 tsp of curry and it was a little overwhelming, therefore, I'd recommend you start with less and work it up to what feels right for you.


Joz just reminded me of another yummy soup I used to make a lot last summer and that fits right in with today's theme:

Curried Cauliflower Soup
From Matt Amsden's "Rawvolution"
Posted on rawsacramento.net

Water from 1 Thai coconut.
1/4 cup distilled/ spring/ filtered water.
1/4 cup stone pressed olive oil.
1/8 cup Nama Shoyu (an unpasteurized soy sauce).
1/8 cup fresh lemon juice.
2 cups cauliflower.
2-3 ribs celery.
1/3 cup raw macadamia nuts (can sub with cashews)
1/2 tsp. curry powder.
3-4 cloves peeled garlic.

1. In a blender, combine all ingredients and thoroughly blend.

2. Serve garnished with chopped cauliflower florets.


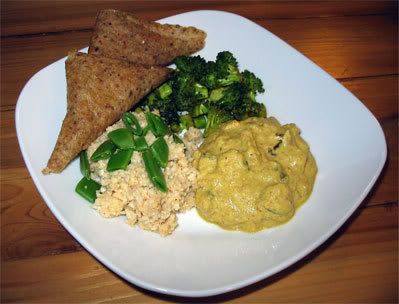
Next came our entree: Samosas, Ginger Un-Steamed 'Rice' with Snow Peas, Curry Sauce and Marinated Curry Broccoli:


Samosas: Indian Finger Food
I used to adore SAD samosas: little pockets filled with a mixture of veggies and spices, and (unfortunately) deep-fried. During my visit to Calgary last January, I had the privilege to meet Raw Chef Diana Stoevelaar and her partner Manu. As I was telling them how I'd like to make some kind of wrap using fresh coconut, Manu silently went to get his cell phone and came back with this huge grin on his face. "Look at this!", he said proudly. On his tiny phone screen was a photo of a platter of raw samosas; one of Diana's most prized creations.

She then told me how she did a lot of research and experimentation, wanting to surprise Manu (who is of East Indian background) with a raw version of samosas. Well, her efforts paid off big time, as she was successful in creating a recipe that faithfully reproduces the spices used in the part of India Manu comes from. Diana said that when she presented them to him, he actually had tears in his eyes. (Ahhhhhh...Manu, you're such a sweet, lovely man!)

I was thrilled when Diana generously offered to share her samosas recipe with me. On the down side, she's also asked that I don't reveal the ingredients, as it will be featured in an upcoming raw book. But that doesn't mean you can't salivate over the photos! lol

Samosas In The Making
Needless to say that I put on my Chef's hat and made her samosas as soon as I got home. They truly are sublime! A subtly flavored coconut wrapper filled with a mixture of cauliflower, carrot, celery, sweet peas and an exotic blend of Indian spices. Heavenly!

There are different coconut wrap recipes floating around the net that would work really well as pastry for samosas. You might want to check out Vanessa Sherwood's Vietnamese Spring Rolls wrappers, posted on GLiving. Sarma Melngailis, author of "Raw Food Real World", has a very tasty samosas recipe on there too. Just make sure you spread the batter thinly and score it into 3½”x 6½” strips.

For my part, I still had some of Diana's samosas pastry in the freezer, so all I had to do was prepare the filling. I warmed up the mixture in the D for a couple of hours, uncovered, then proceeded to assemble the samosas. Alternatively, you could use your favorite 'rice' recipe (I'll be sharing mine a little further along) with some sweet peas and Indian spices. Again, Sarma's version is really delicious so you might want to give it a try.

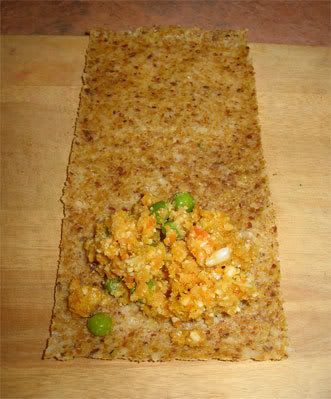
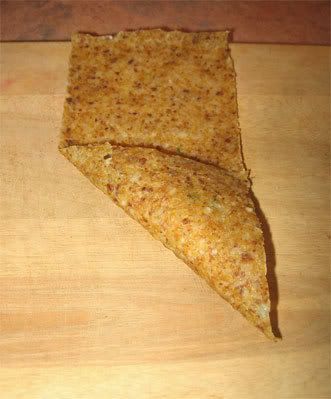
I personally had a hard time visualizing how to make the little buggers, from just reading the instructions. Here's something to help you out in case you're in the same boat...

A'right! Let's do it!

First, place a generous tablespoon of the filling at one end of a samosas wrapper:

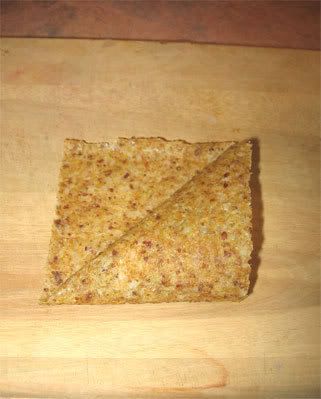
Fold one corner over diagonally to meet the other side, so as to form a triangle:


Continue folding like a flag...


Finish off by wetting the end of the wrapper slightly to seal.

Voila! A delicious raw samosas!


I then popped the assembled samosas in the D for a couple of hours so they were nice and warm.

The funny thing is that Luna99, of Raw Food Talk Forum, just posted about a recent meal she had at Pure Food and Wine, Sarma's raw restaurant in New York city. Wouldn't you know it, amongst all the beautiful food she ordered were Cauliflower Samosas! In fact, she's even taken a few photos and given a review of her culinary experience on her blog: All You Need Is Raw. (Cool name, by the way!)

OK, 'nuff said... Here's Sarma's recipe:

Cauliflower Samosas
By Sarma Melngailis
Posted here on Green Chefs

Makes 20 samosas


For the samosa wraps:
2 cups young coconut meat
1 ½ cups coconut water (or more)
½ teaspoon cayenne
½ teaspoon sea salt

In a Vita-Mix or high-speed blender, puree the coconut with the coconut water, cayenne, and salt until completely smooth. Using an offset spatula, spread the coconut very thin on Teflex-lined dehydrator trays and dehydrate at 115 F for 2 to 4 hours, or until the surface is dry. Carefully flip over and peel away the Teflex sheets. Dehydrate further on the screen only, just to dry the underside, 15 to 30 minutes longer. The wraps should be very thin, almost transparent, and very pliable.

Carefully slide the wraps onto a flat cutting surface and cut into large rectangles, about 3 by 7 inches, and set aside.


For the filling:
1 large head cauliflower, florets only
½ cup raw macadamia nuts
1 cup filtered water
1 tablespoon garam masala
2 teaspoons Chunky Chat masala (or substitute garam masala)
1 tablespoon chopped fresh ginger
Sea salt
Freshly ground black pepper
1 cup fresh peas or thawed frozen peas
1 handful julienned cilantro

Place the cauliflower florets in a food processor and pulse a few times to chop into small pieces. It’s okay if they are not entirely uniform in size - they add texture.

In a high-speed blender, add the nuts, water, garam masala, Chunky Chat, and ginger and puree at high speed for 2 minutes until completely smooth. It should be the consistency of heavy cream. Season with salt and pepper to taste.

Add the cauliflower, peas, and macadamia cream to a shallow glass bowl or pan and stir to combine. Place the bowl in the dehydrator and dehydrate at 115 F for about 2 hours, stirring occasionally, until the cauliflower becomes somewhat tender and the cream thickens a bit.

Toss the cilantro in with the cauliflower mixture just before filling the wraps.

For serving:
Place a heaping tbs of cauliflower filling at one end of a coconut wrapper. Fold one corner over diagonally to meet the other side, to form a triangle. Fold the samosa over and continue folding like a flag. Wet the end of the wrapper slightly to seal.

Sarma then suggests to serve these with the following sauces:

For the tamarind sauce:
1 cup soaked and strained tamarind pulp
3 tablespoons maple syrup
1 tablespoon nama shoyu
1 tablespoon extra-virgin olive oil
Pinch of sea salt

Place the tamarind pulp, maple syrup, nama shoyu, and olive oil in a blender and puree until smooth. Taste for seasoning and add a pinch of salt if necessary. Place in a separate bowl and set aside. This sauce may be made ahead and refrigerated for up to 2 days. It can also be frozen if you have leftovers or want to make it in advance.

For the banana tamarind sauce:
1 cup Tamarind Sauce
1 small banana
1 teaspoon ground cumin
1 teaspoon minced ginger
1 small red chili pepper, seeded
Pinch of sea salt

Puree the sauce ingredients in a blender until completely smooth. Transfer to a separate container and set aside.

For the Mango Chutney:
4 cups diced ripe mango
3 tablespoons lime juice
2 tablespoons minced ginger
2 green onions, white and 1 inch of green, diced
½ small jalapeno, cored and seeded, diced
½ teaspoon sea salt
1 small handful cilantro leaves
For serving:
1 cup Mango Chutney
1 small handful mint leaves, finely julienned

In a food processor, add all of the ingredients and pulse to combine well, but keep it chunky. Store in a covered container in the refrigerator for up to 2 to 3 days. (Makes about 4 Cups and is a nice accompaniment to other dishes or on it’s own as well.)


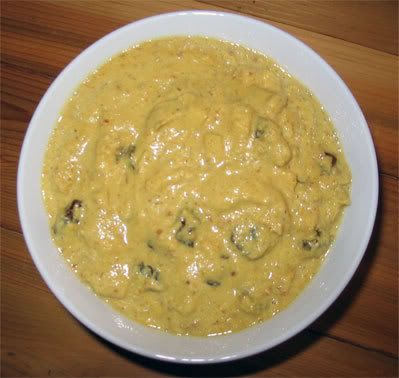
I served ours along with an incredibly easy and tasty curry sauce by Richard Salome. Oh my! The banana, apples and raisins called for in the recipe made me a little skeptical at first, but they really make the dish! So go ahead, surprise your taste buds... They'll be grateful that you did!


Curry Sauce
By Richard Salome
Originally posted by vegangelist on Raw Food Talk Forum

Makes 8 servings

1 cup almonds, soaked 12-24 hours, blanched
16 ounces purified water
2 medium sized Fuji apples, cored & diced
1 cup raisins, unsoaked
1 teaspoon curry powder
2 tablespoons flax seed oil
2 tablespoons tamari or to taste
1 medium sized ripe banana

Place the almonds in a blender and add enough water to cover them. Blend until creamy.

Add curry, flax oil, banana, tamari and process for 20 seconds.

Then add apples and raisins by hand.

Pour sauce over veggies of choice (if using).

Stir well and place in dehydrator, covered, for at least 2 hours until warm to the touch, below 112 degrees.

This is a rich dish, and makes a wonderful Thanksgiving dish or for a special occasion.

Carmella's Notes:
This makes a LOT of sauce so you might want to halve the recipe.

As you can see, even Da Puss wanted to check it out! (Although I'm beginning to think that she just plain loves to be in front of the camera! lol)


I've served this fabulous sauce before over a mixture of chopped up broccoli, red onion, zucchini and sweet potato. Mmmmmmmmm.... It's also lovely as is, on top of a bed of 'rice'.

Not Quite Rice
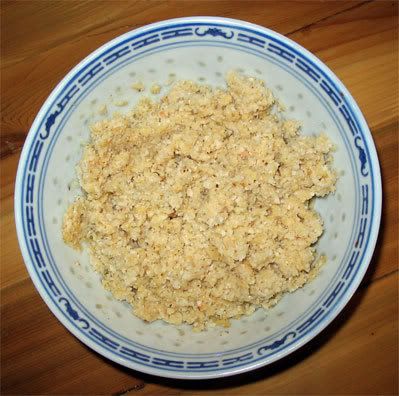
Now, there are many versions of 'rice', usually calling for cauliflower. Personally, I like to use a mixture of cauliflower and parsnip as I find it takes some of the 'bite' away. For this particular feast, I came up with the following and it was one of the best I've made so far.


Ginger Un-Steamed 'Rice'
1 1/2 - 2 cups cauliflower
1 1/2 cups parsnip
Salt, to taste
Heaping spoonful of almond butter or tahini (I used both)
1 T grated fresh ginger
A little lemon juice

Process cauliflower and parsnip in food processor until rice-size.

Mix other ingredients by hand.


Finally, I also prepared some Marinated Curry Broccoli. I put some broccoli florets and chopped stems in a bowl and tossed them in a little olive oil, Braggs, curry powder and garam masala. Then I left the whole thing, covered, in the dehydrator for a couple of hours.

I think that about wraps it up (pun intended!)

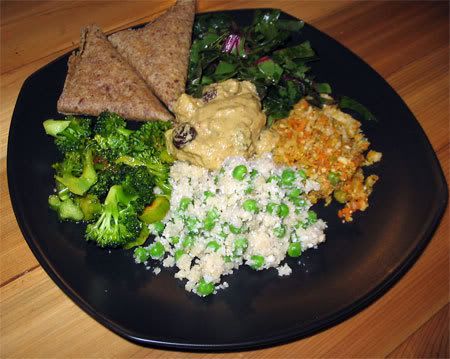
Oh, here's a photo of a previous Indian meal we've had: Samosas, Curried Broccoli and Greens, Richard's Curry Sauce, Cauliflower Rice and Peas and some left-over samosas' filling.


There are other Indian-style raw dishes I have yet to try. One of them is Raw Chef Russell James' Spinach Masala recipe posted on his ever so inspiring blog. I'm anxiously waiting for good mangoes to show up in our local stores, as they're still really not-so-hot at this time of year (at least, in our boony part of the world.) But that's not to keep you from trying it!

I guess all that was missing was an Indian sweet treat, but to tell the truth, we were so stuffed there wasn't any room left for dessert.

Well, that was some awesome feast worthy of a Maha'raw'dja indeed!

And about my 'rough spot', not to worry! "That, too, shall pass," as Buddha would say. Actually, come to think of it, I bet he would have also enjoyed our scrumptious Indian spread!

*~*~*~*
Photo Credits
Cauliflower Samosas by Sarma Melngailis